The person booking a journey
Browses the marketplace, buys a journey outright or places a bid, pays securely, then tracks the trip and messages the operator. Anyone booking premium travel for less than a fresh charter.
User guide
LuxeLegs is a marketplace for chauffeur dead legs: journeys a car is already making, offered to travellers for less and turning empty miles into revenue for operators. This guide walks through what each type of user can do, with real screens and example journeys.
Who uses LuxeLegs
Every account belongs to one of four roles. Each sees a different home screen and a different set of tools, all built around the same set of journeys.
Browses the marketplace, buys a journey outright or places a bid, pays securely, then tracks the trip and messages the operator. Anyone booking premium travel for less than a fresh charter.
Lists spare capacity, reviews bids, assigns drivers, manages a fleet and its compliance, sets the areas it covers, and tracks recovered revenue against a monthly target.
Sees the jobs their operator has assigned, with the route, vehicle and the traveller's contact details, so pickups run smoothly on the day.
Invites travellers and operators to join, then earns a share of the commission LuxeLegs makes on the journeys those referees go on to sell or book. Accounts are set up by a LuxeLegs administrator.
User type 01
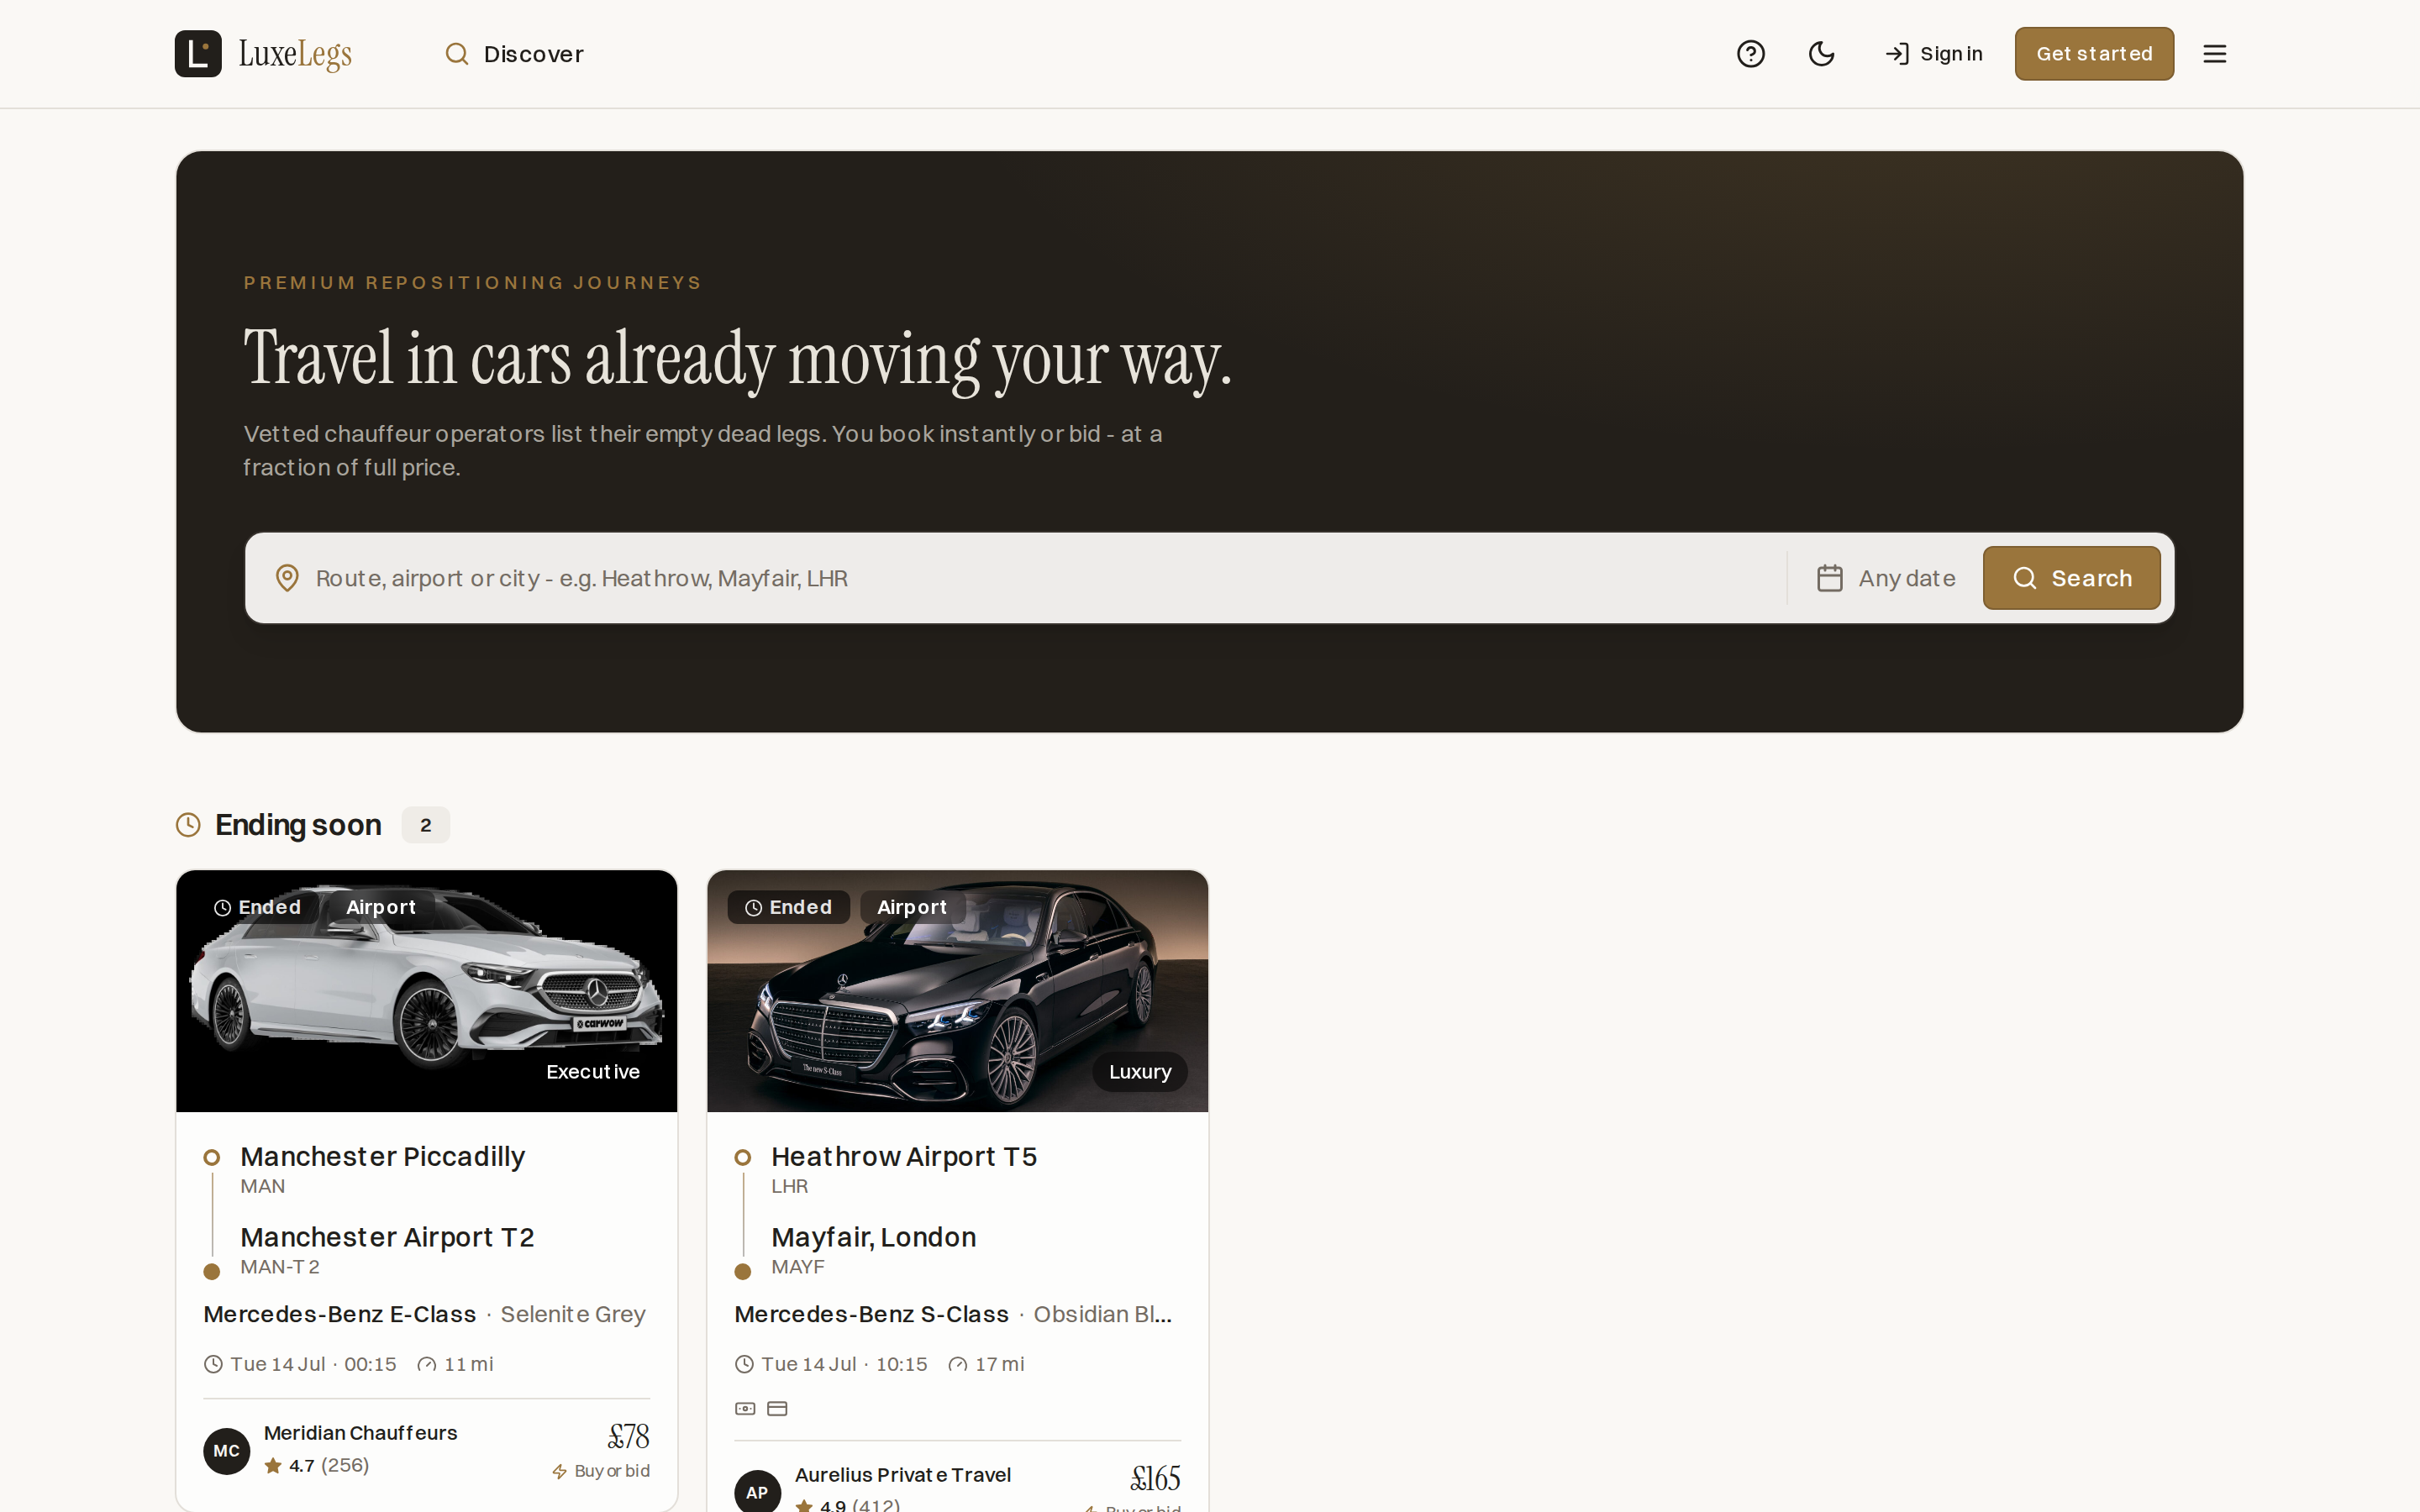
Travellers come to book a premium journey that is already happening. They can buy it instantly at the operator's price, or place a bid and let the operator decide. Payment is held securely and only released to the operator at pickup.
| Feature | What it does |
|---|---|
| Browse the marketplace | See every live journey with route, date and time, vehicle class, price and the operator's rating. |
| Search and filter | Narrow the list by route or date to find a journey that fits. |
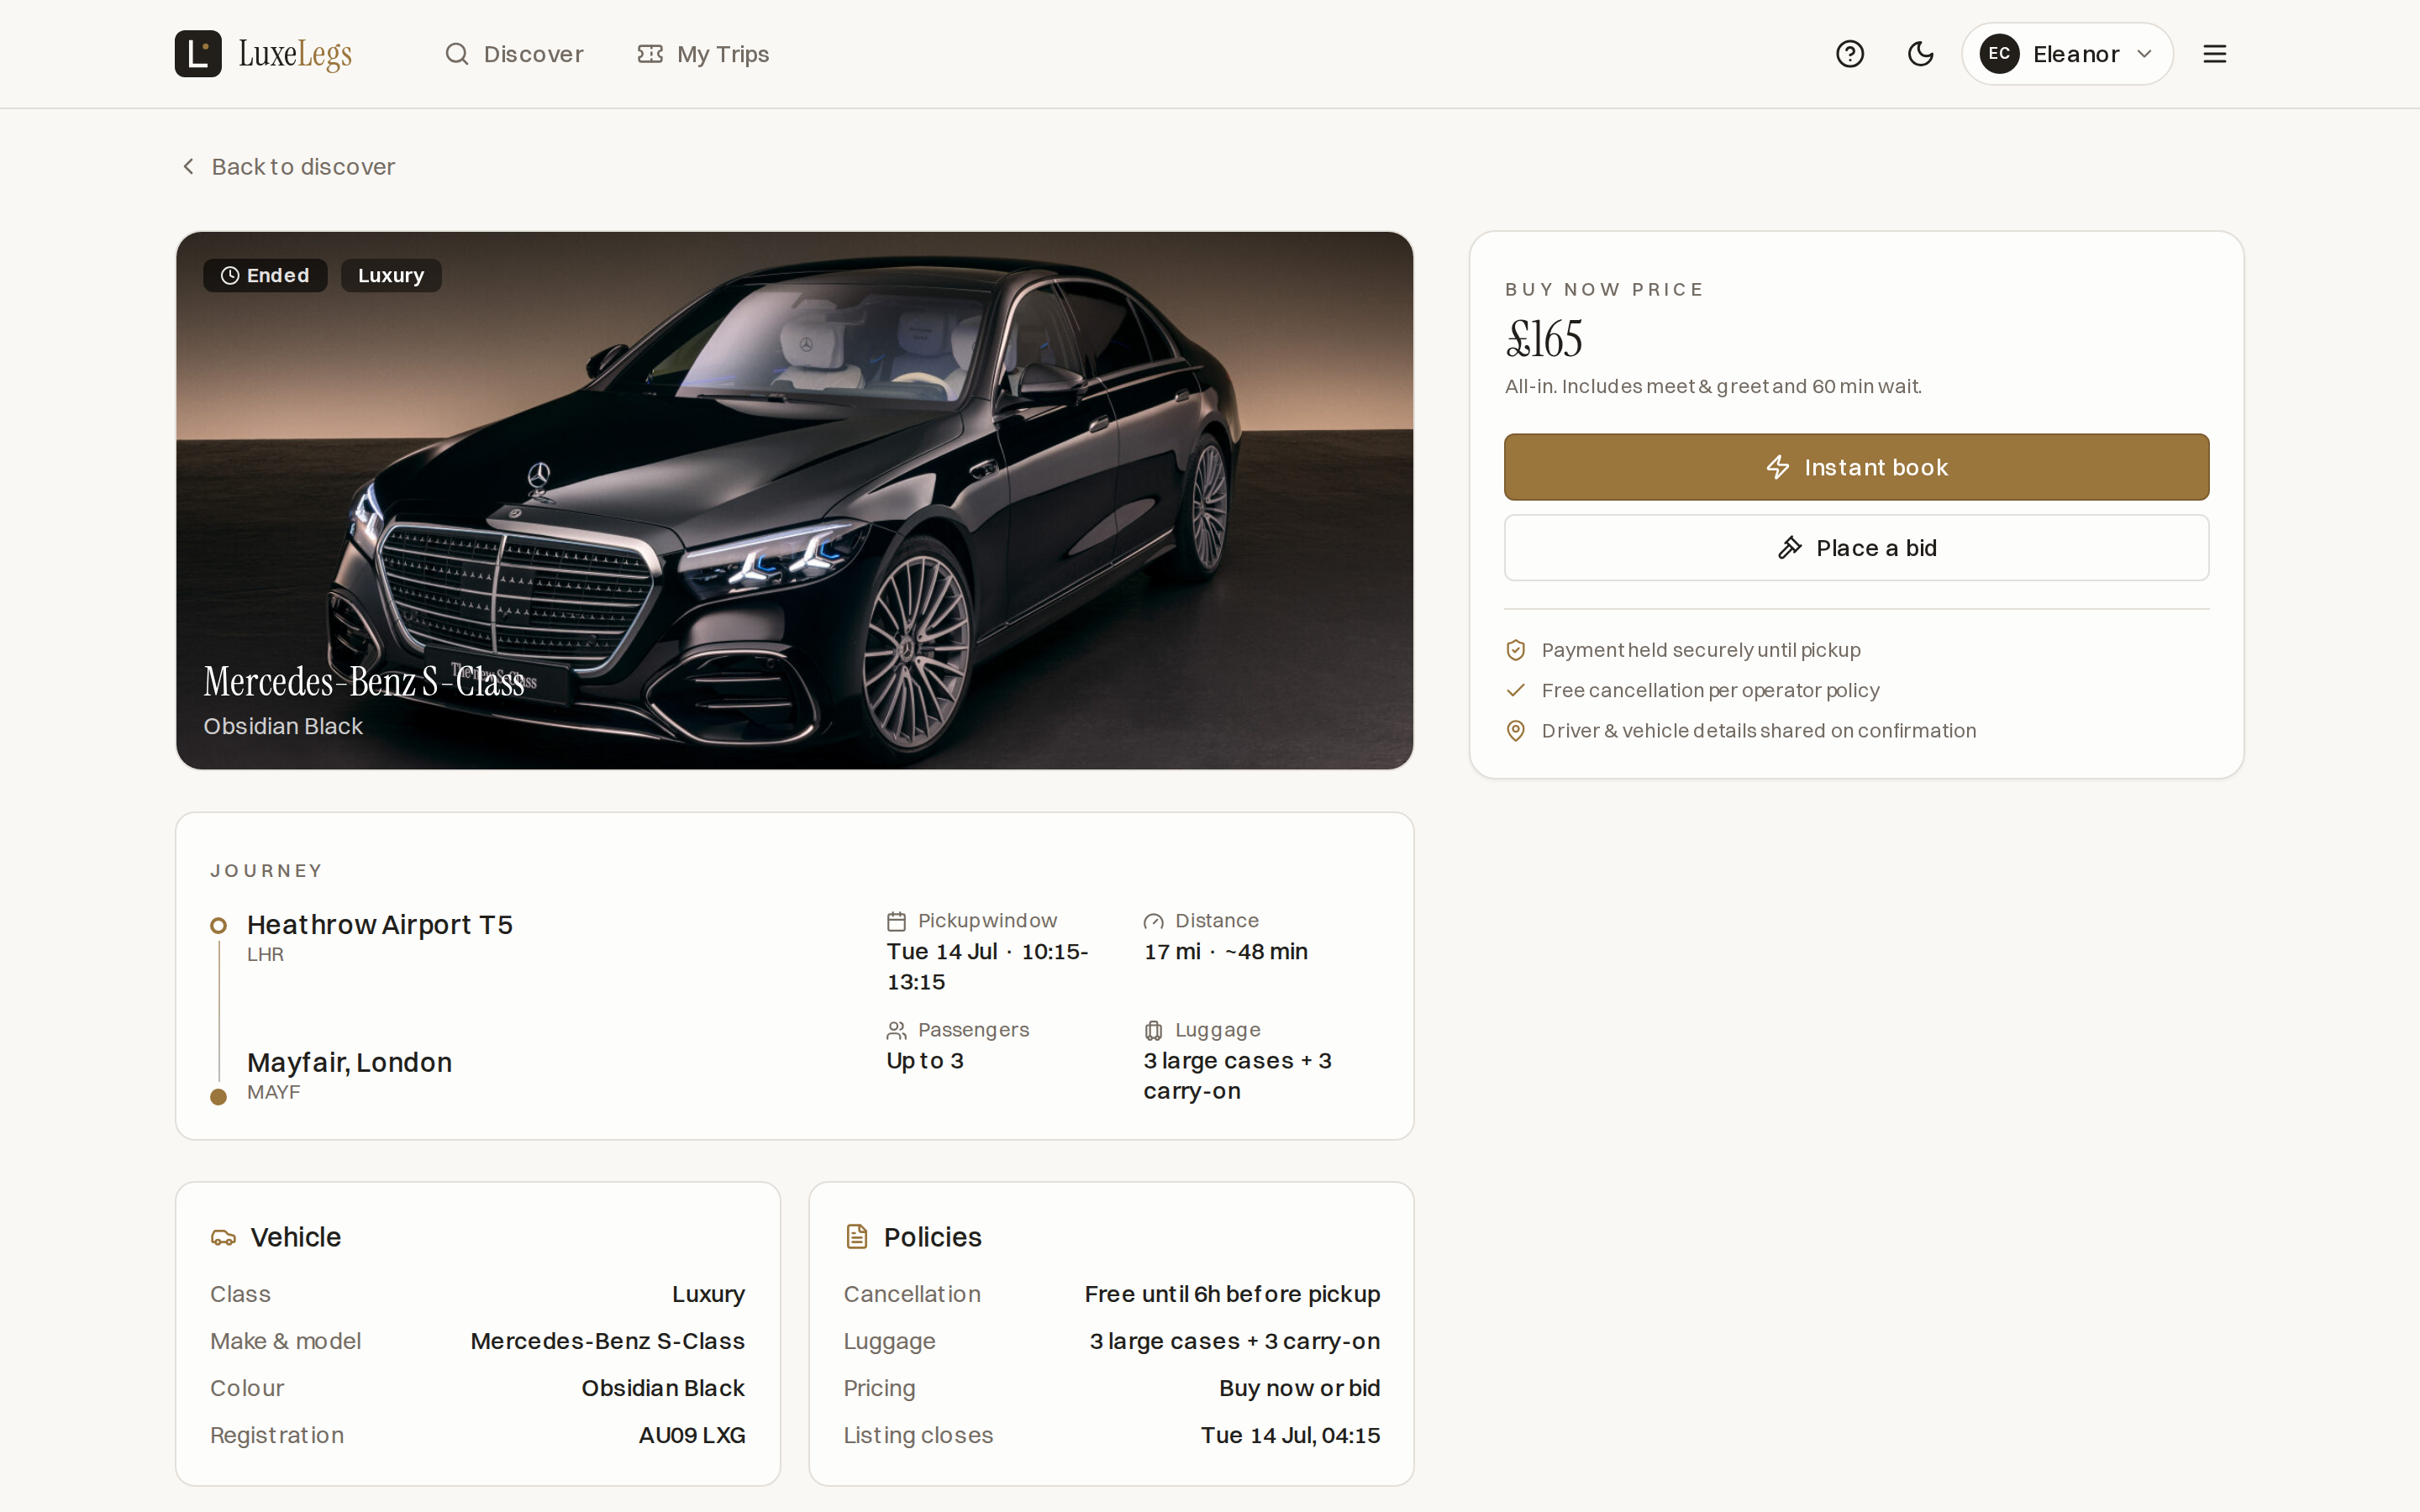
| Journey detail | Open a listing for the full picture: vehicle photos, the exact route, timings and the operator's policies. |
| Instant book | Buy the journey outright at the Buy now price and confirm straight away. |
| Place a bid | Offer your own price on bid enabled listings. The operator accepts or declines. |
| Secure payment | Pay by card. Funds are held and only released to the operator at pickup. |
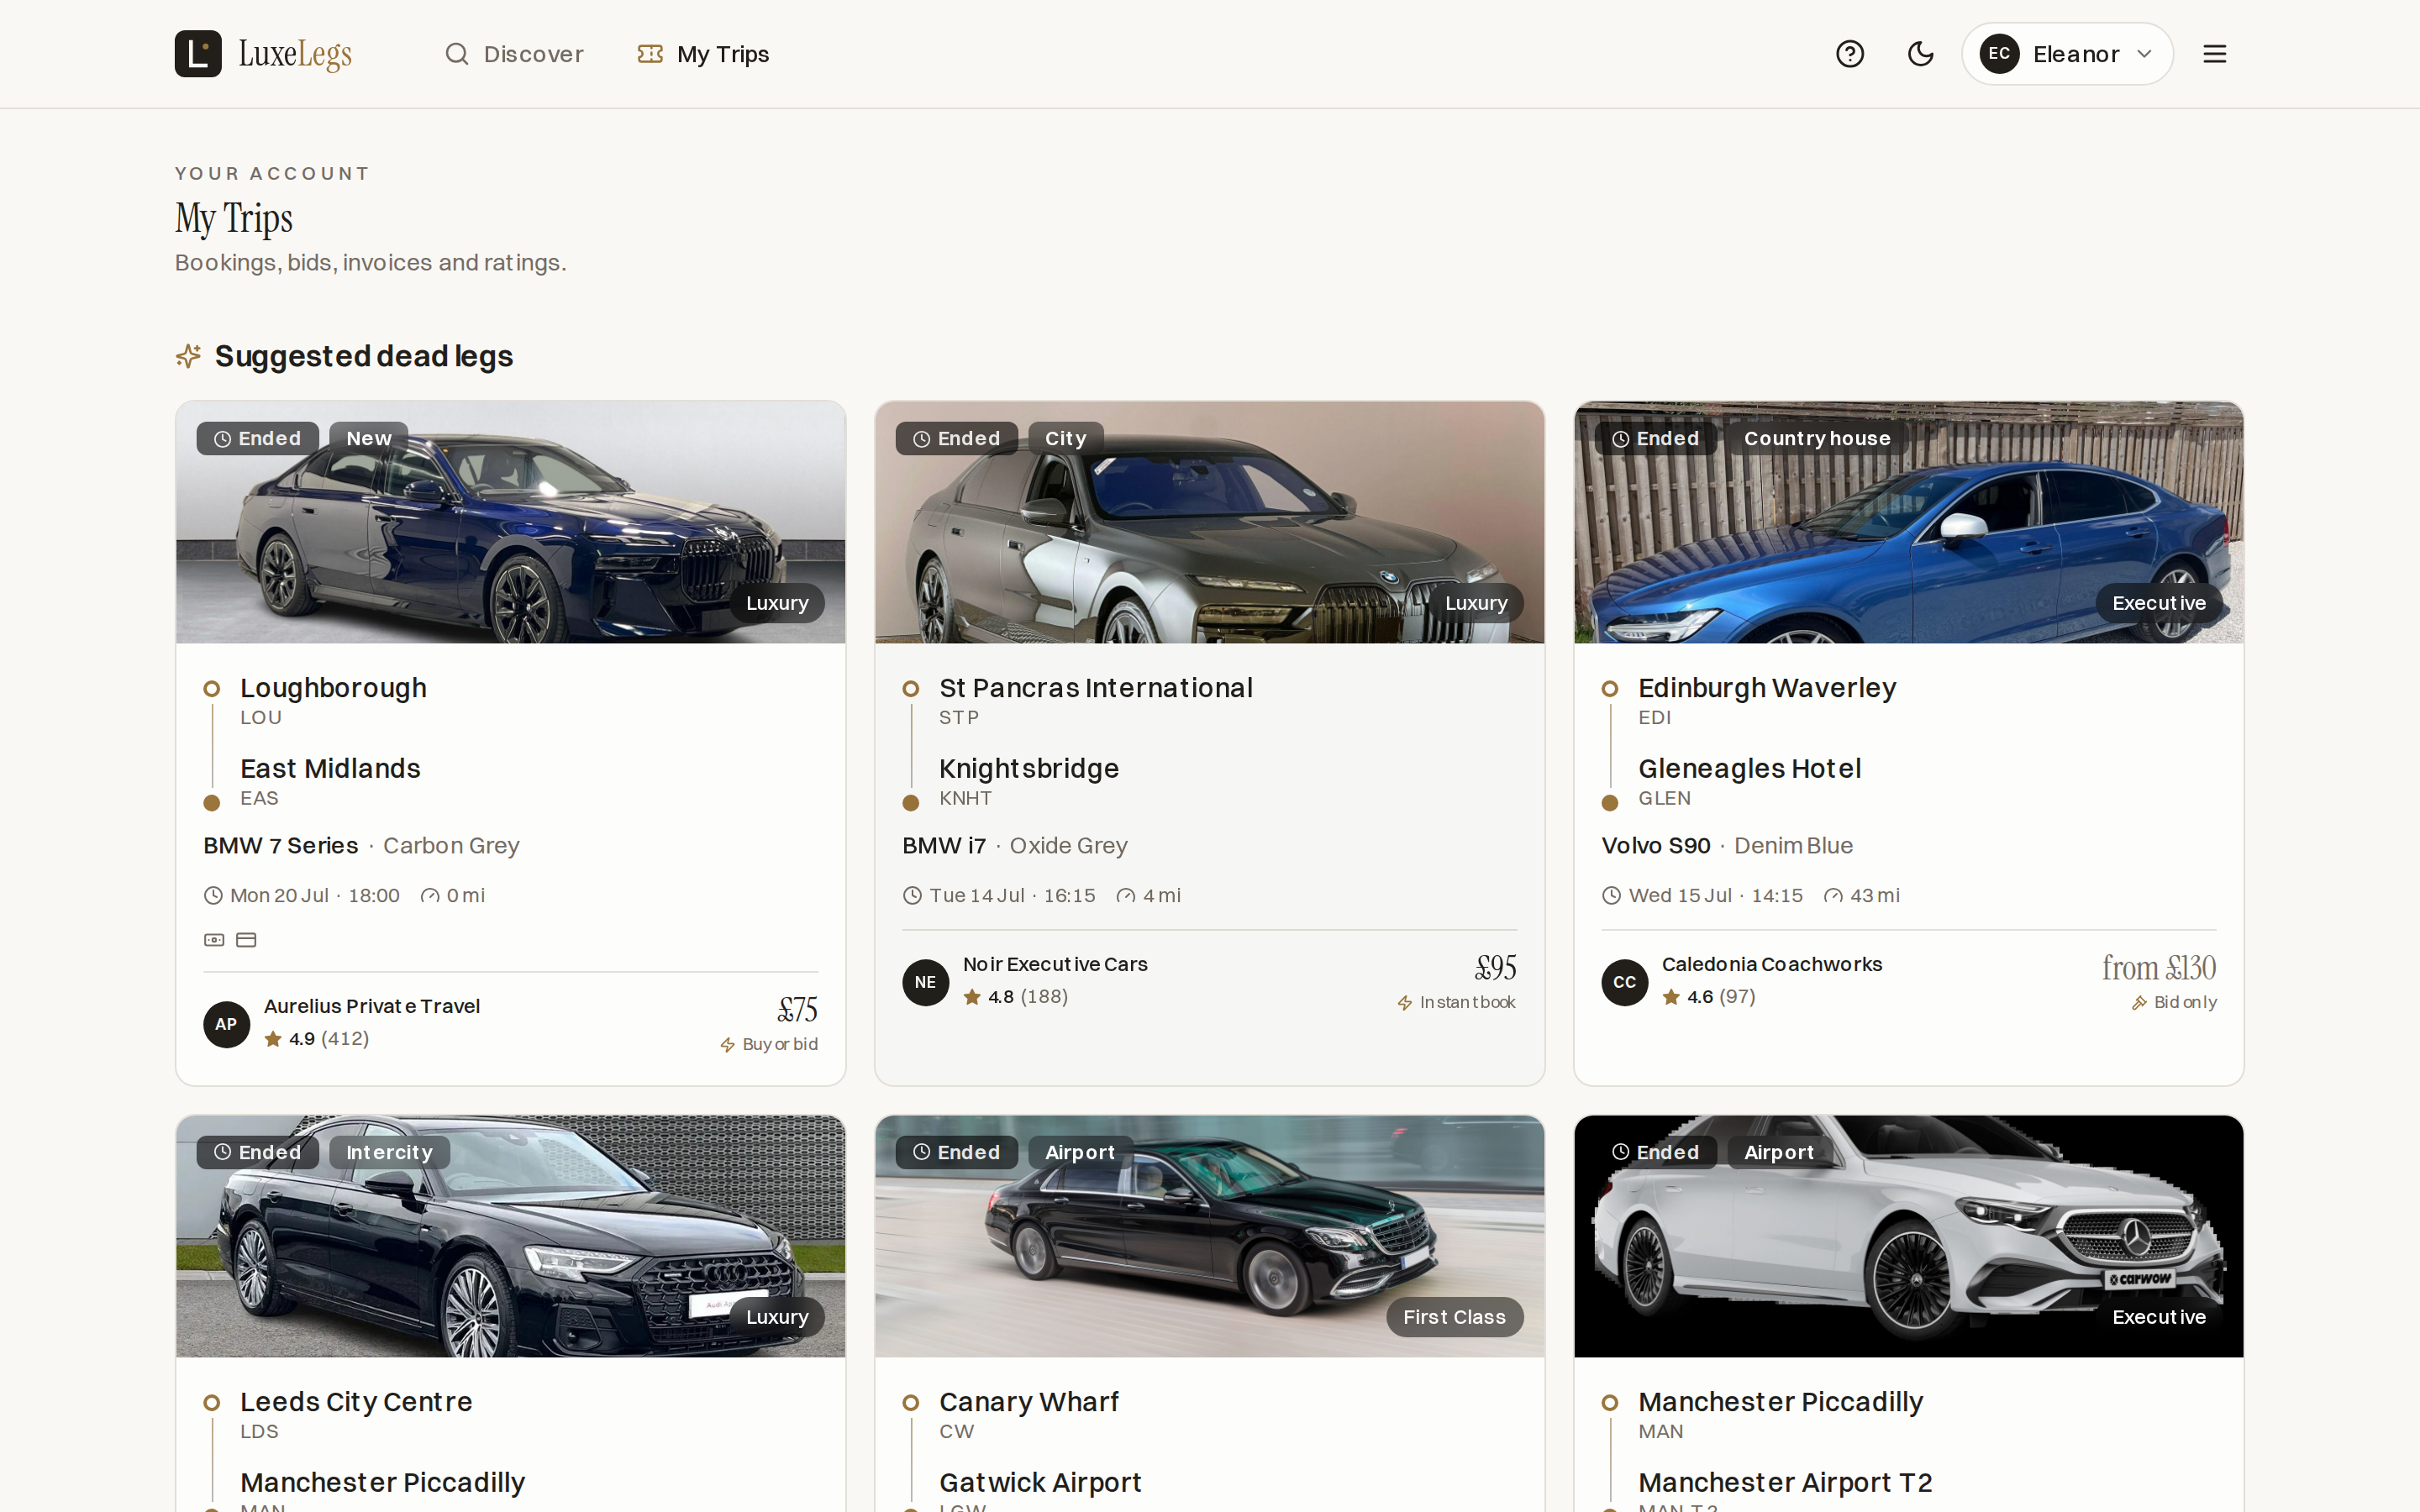
| My Trips | Track active bids, upcoming confirmed bookings and past trips in one place. |
| Invoices | Download an invoice for any booking. |
| Messages | Message the operator or driver on each trip thread. |
| Reviews | Rate the operator after a completed journey. |
| Location preferences New | Set your home county and any counties or places you are interested in, so matching journeys are easier to find. |
| Account & security | Manage profile, phone number, password, email and two factor authentication. |
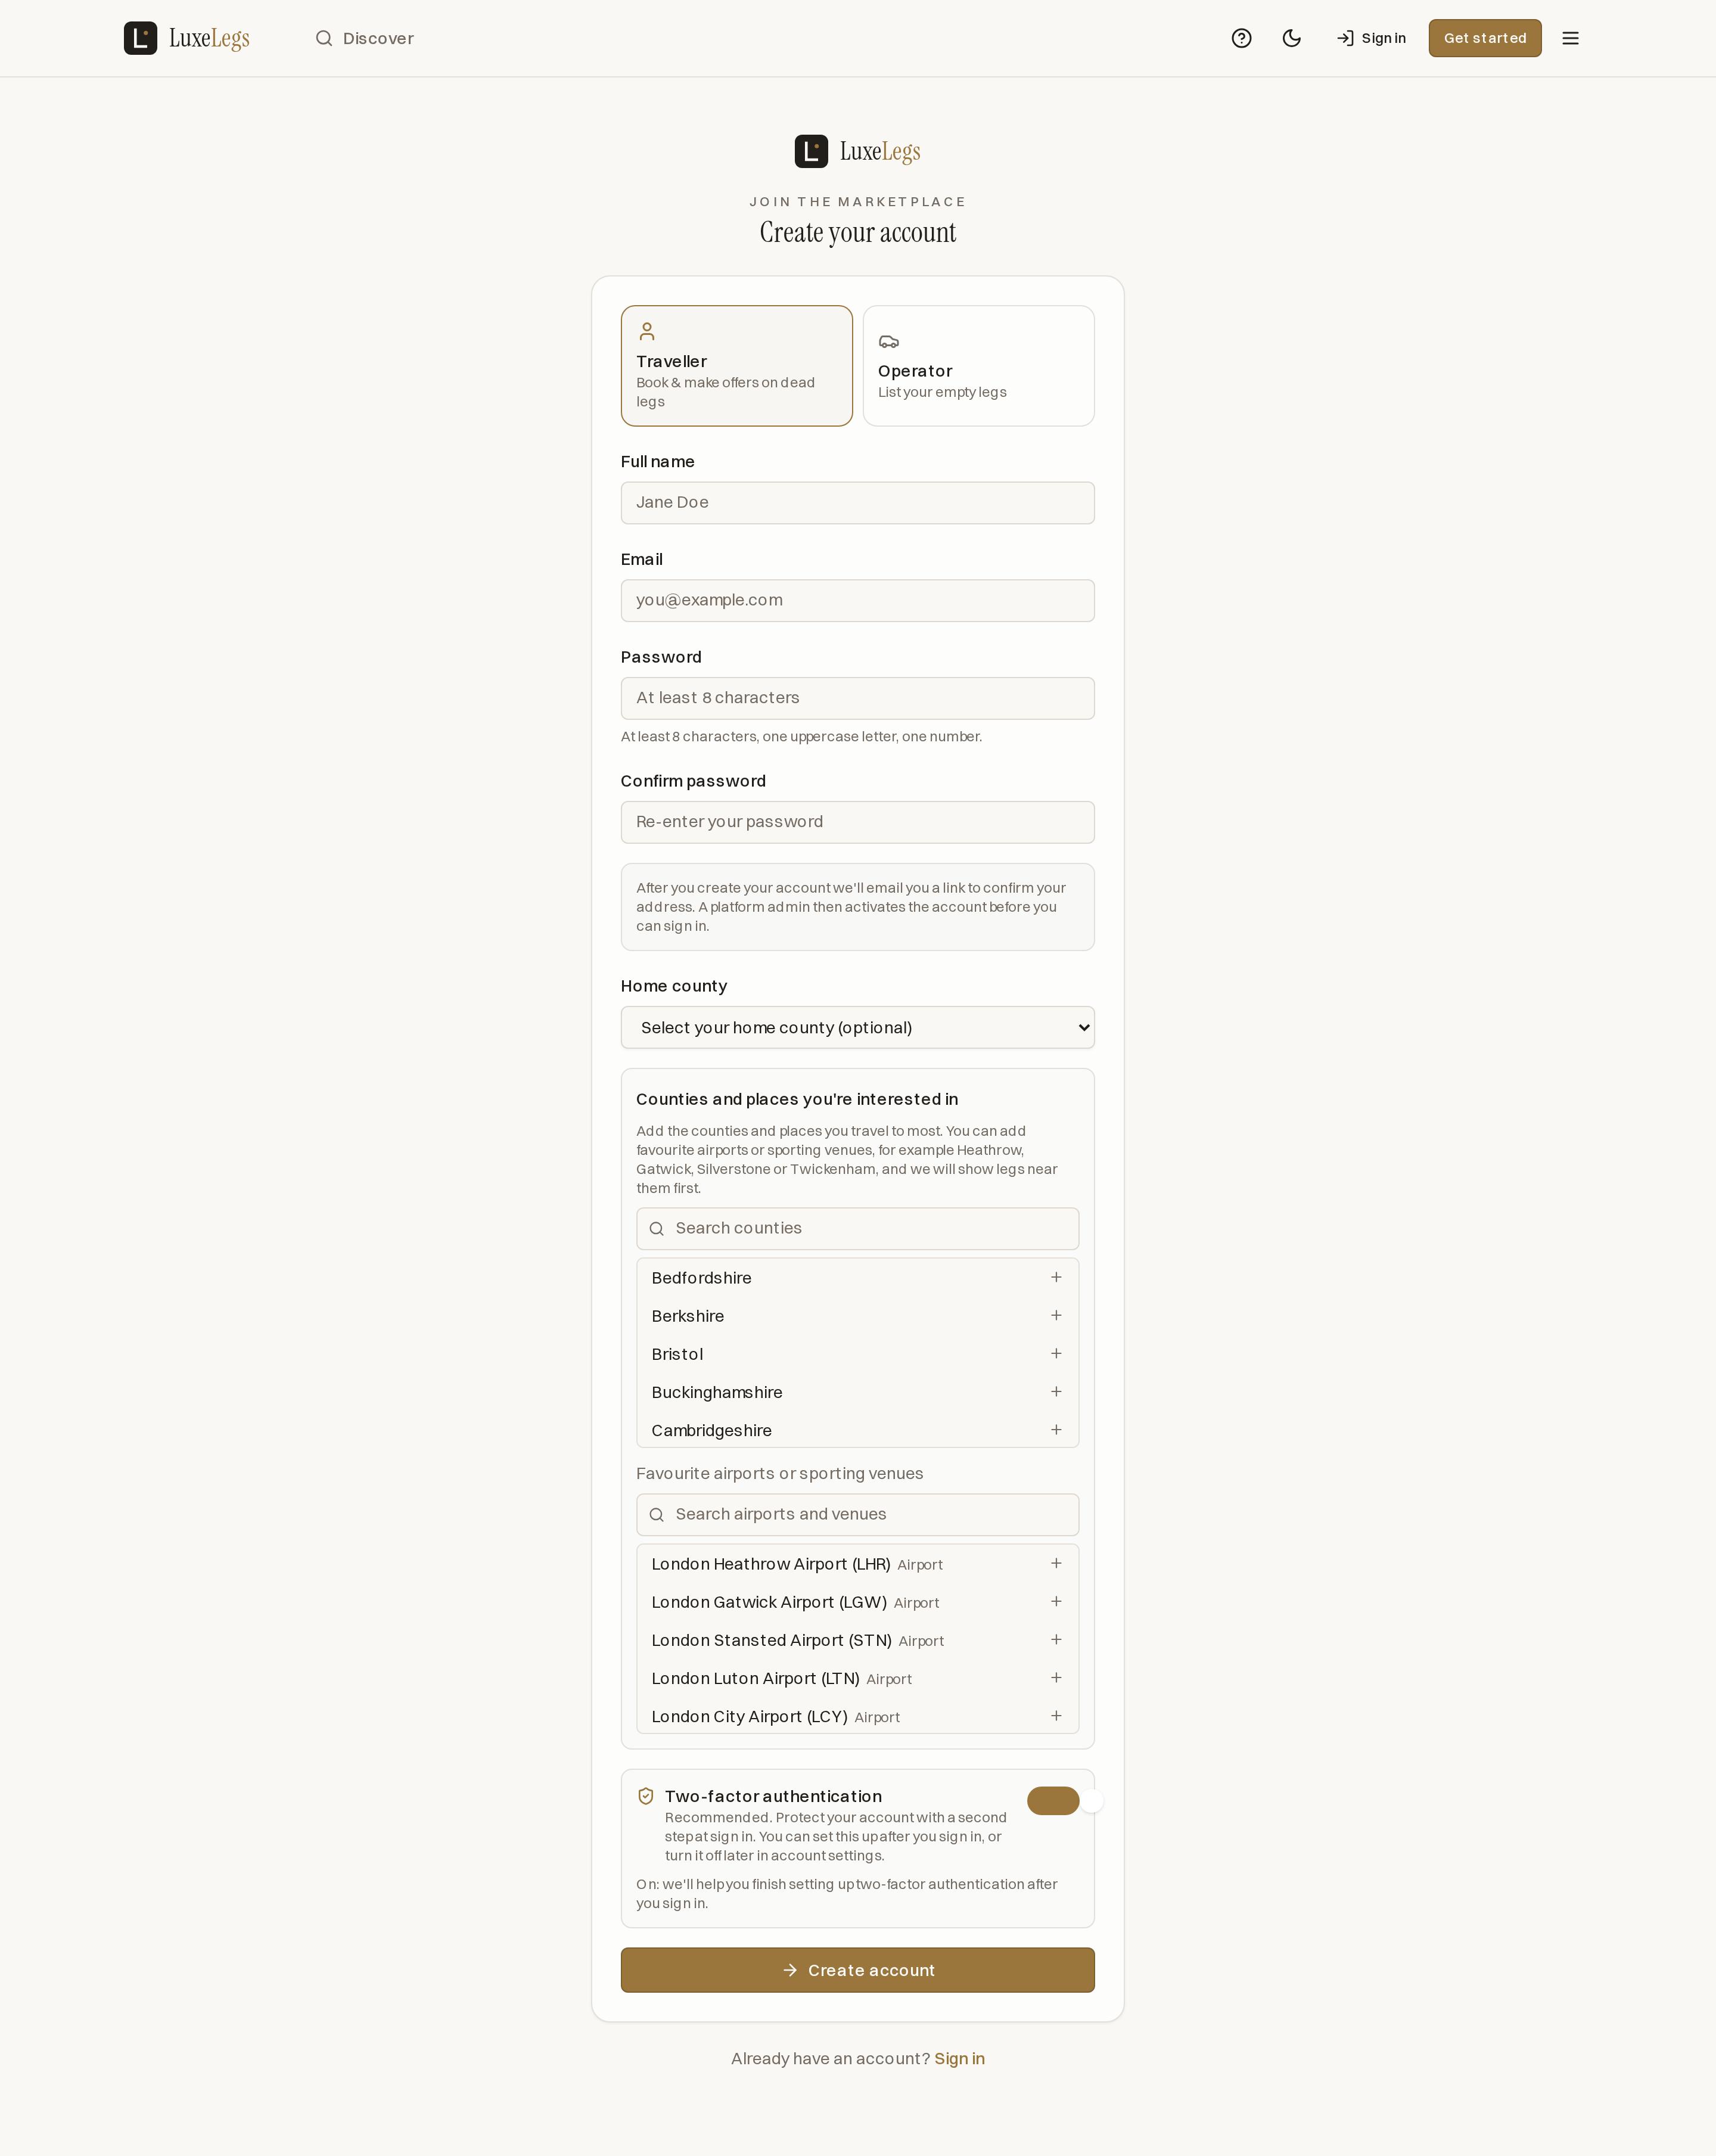
On sign up, you pick your home county from a searchable UK county list, the same list operators use for their service zones. You can also add other counties and specific places you are interested in, such as a favourite airport or sporting venue, for example Heathrow or Silverstone. You can update all of this later from your account settings page.
The marketplace and your dashboard use these preferences to order listings, not to hide any of them: you still see every live journey. Matches on your home county are surfaced first, then your preferred counties, then your preferred places, and a matching journey may carry a small "Near your preferences" badge. Set no preferences and you see the normal default order.
Open the marketplace and pick a listing that matches your route and time, for example Heathrow T5 to Mayfair.
Check the vehicle, timings and policies on the listing page. Decide whether to buy now or bid.
Instant book at the listed price, or offer your own price and wait for the operator to respond.
Enter your card. The amount is held safely and only paid to the operator once you are picked up.
Follow the booking in My Trips, message the operator with any details, and download your invoice.
After the journey, leave a rating so other travellers know what to expect.
User type 02
Operators are the chauffeur and executive travel firms. Their console turns empty miles into revenue: list dead legs, take bids, assign drivers, keep the fleet compliant, define where they cover, and watch recovered revenue build against a monthly target.
| Feature | What it does |
|---|---|
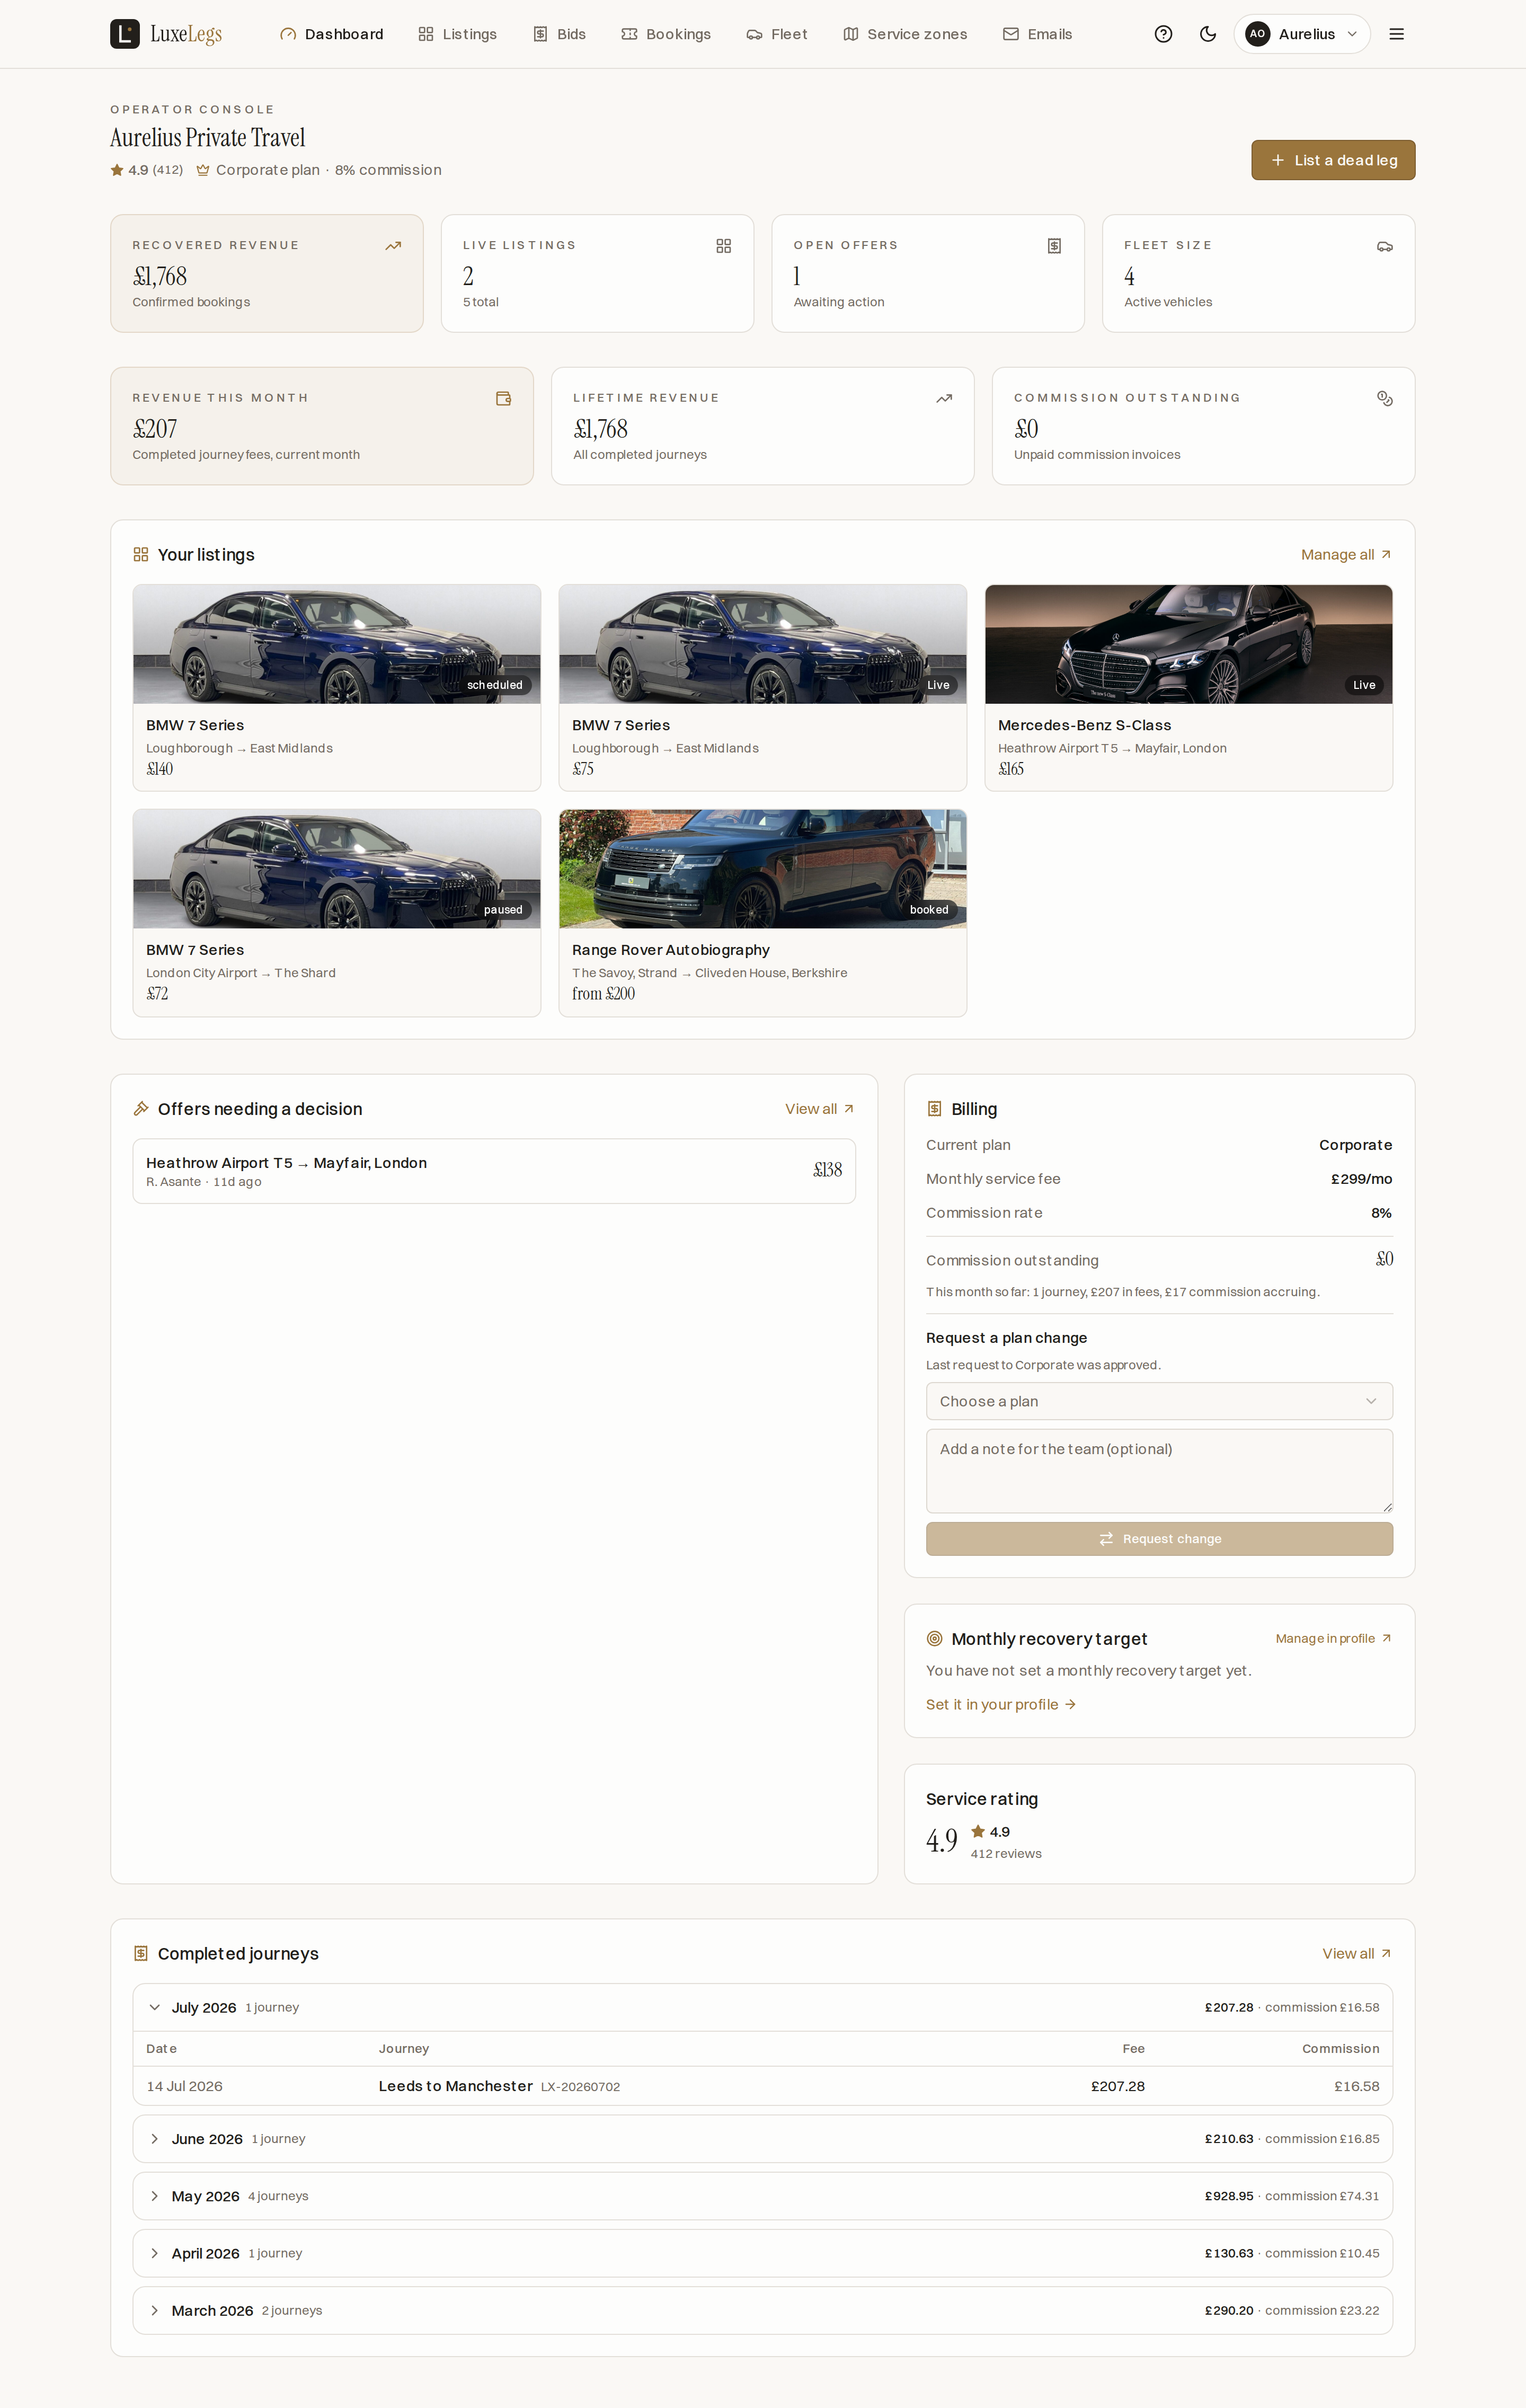
| Dashboard | See recovered revenue, live listings, open bids and fleet size at a glance, plus billing and a monthly recovery target. |
| List a dead leg | Publish a spare journey with route, timing, price and whether it accepts bids. |
| Listings | Manage every listing with its route, pickup, pricing, close time and status (live, scheduled, paused, booked or ended). |
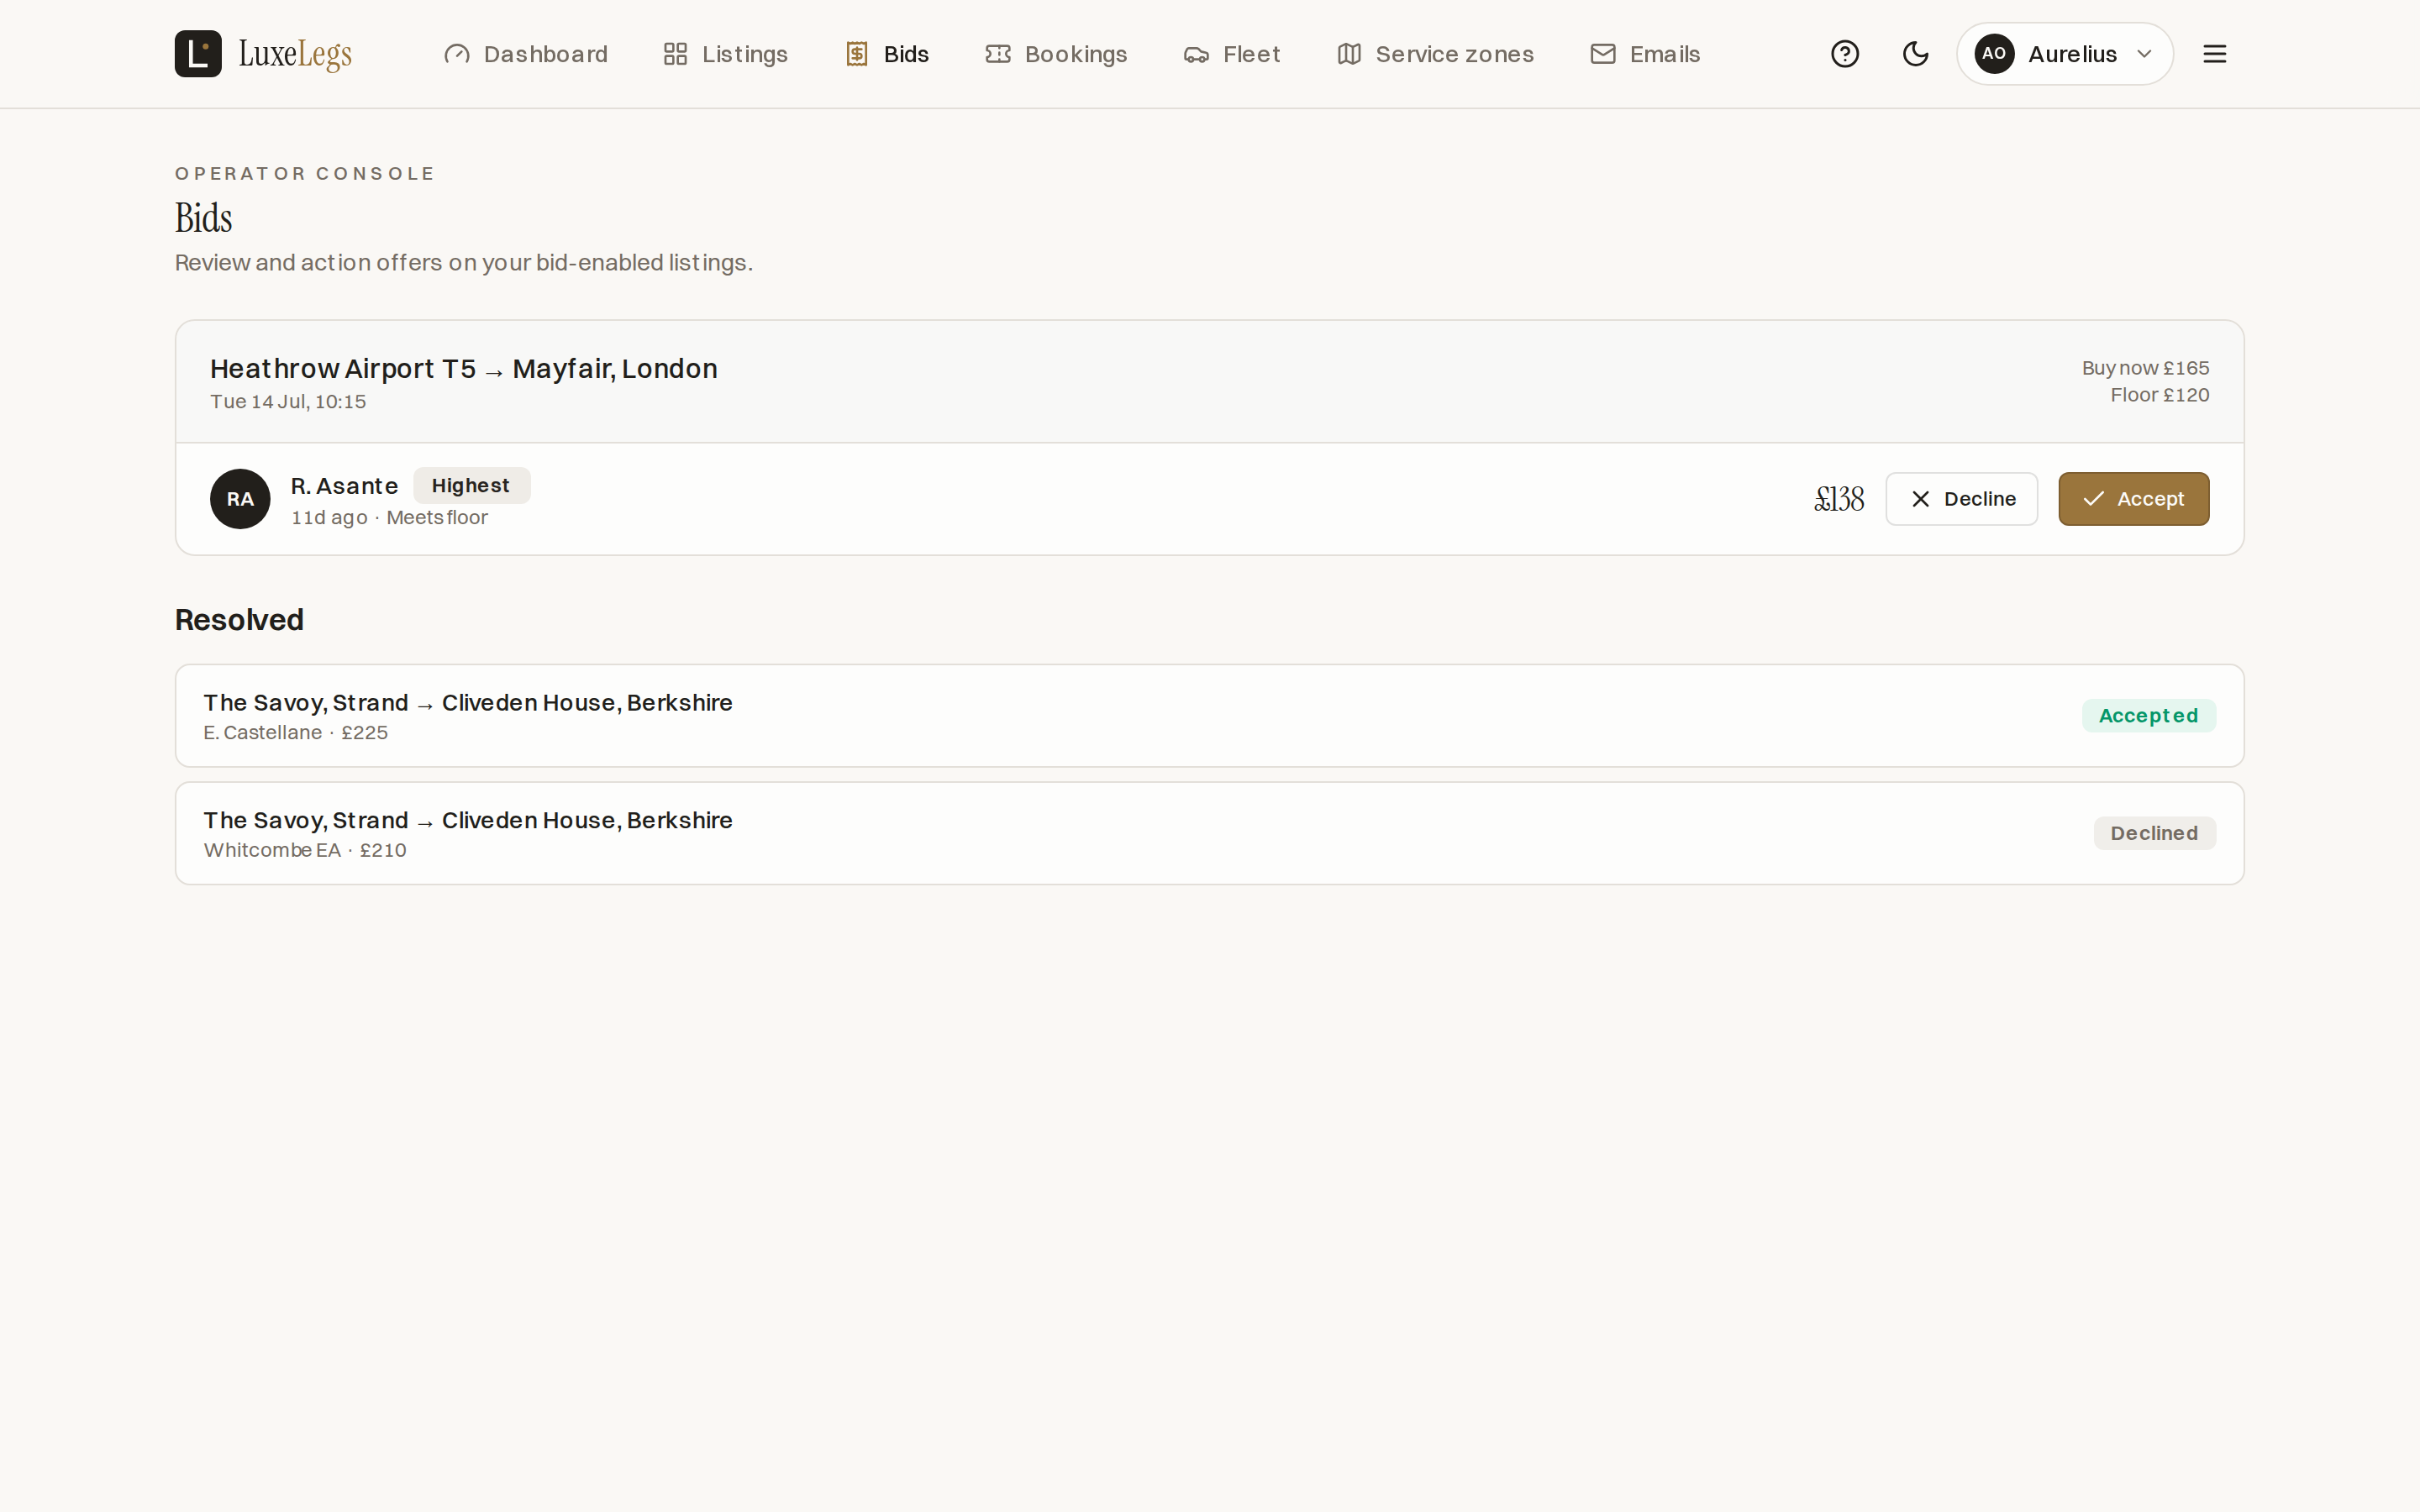
| Bids | Review offers, see which meet the reserve, then accept or decline. |
| Bookings | Assign a driver to a confirmed booking and mark trips complete. |
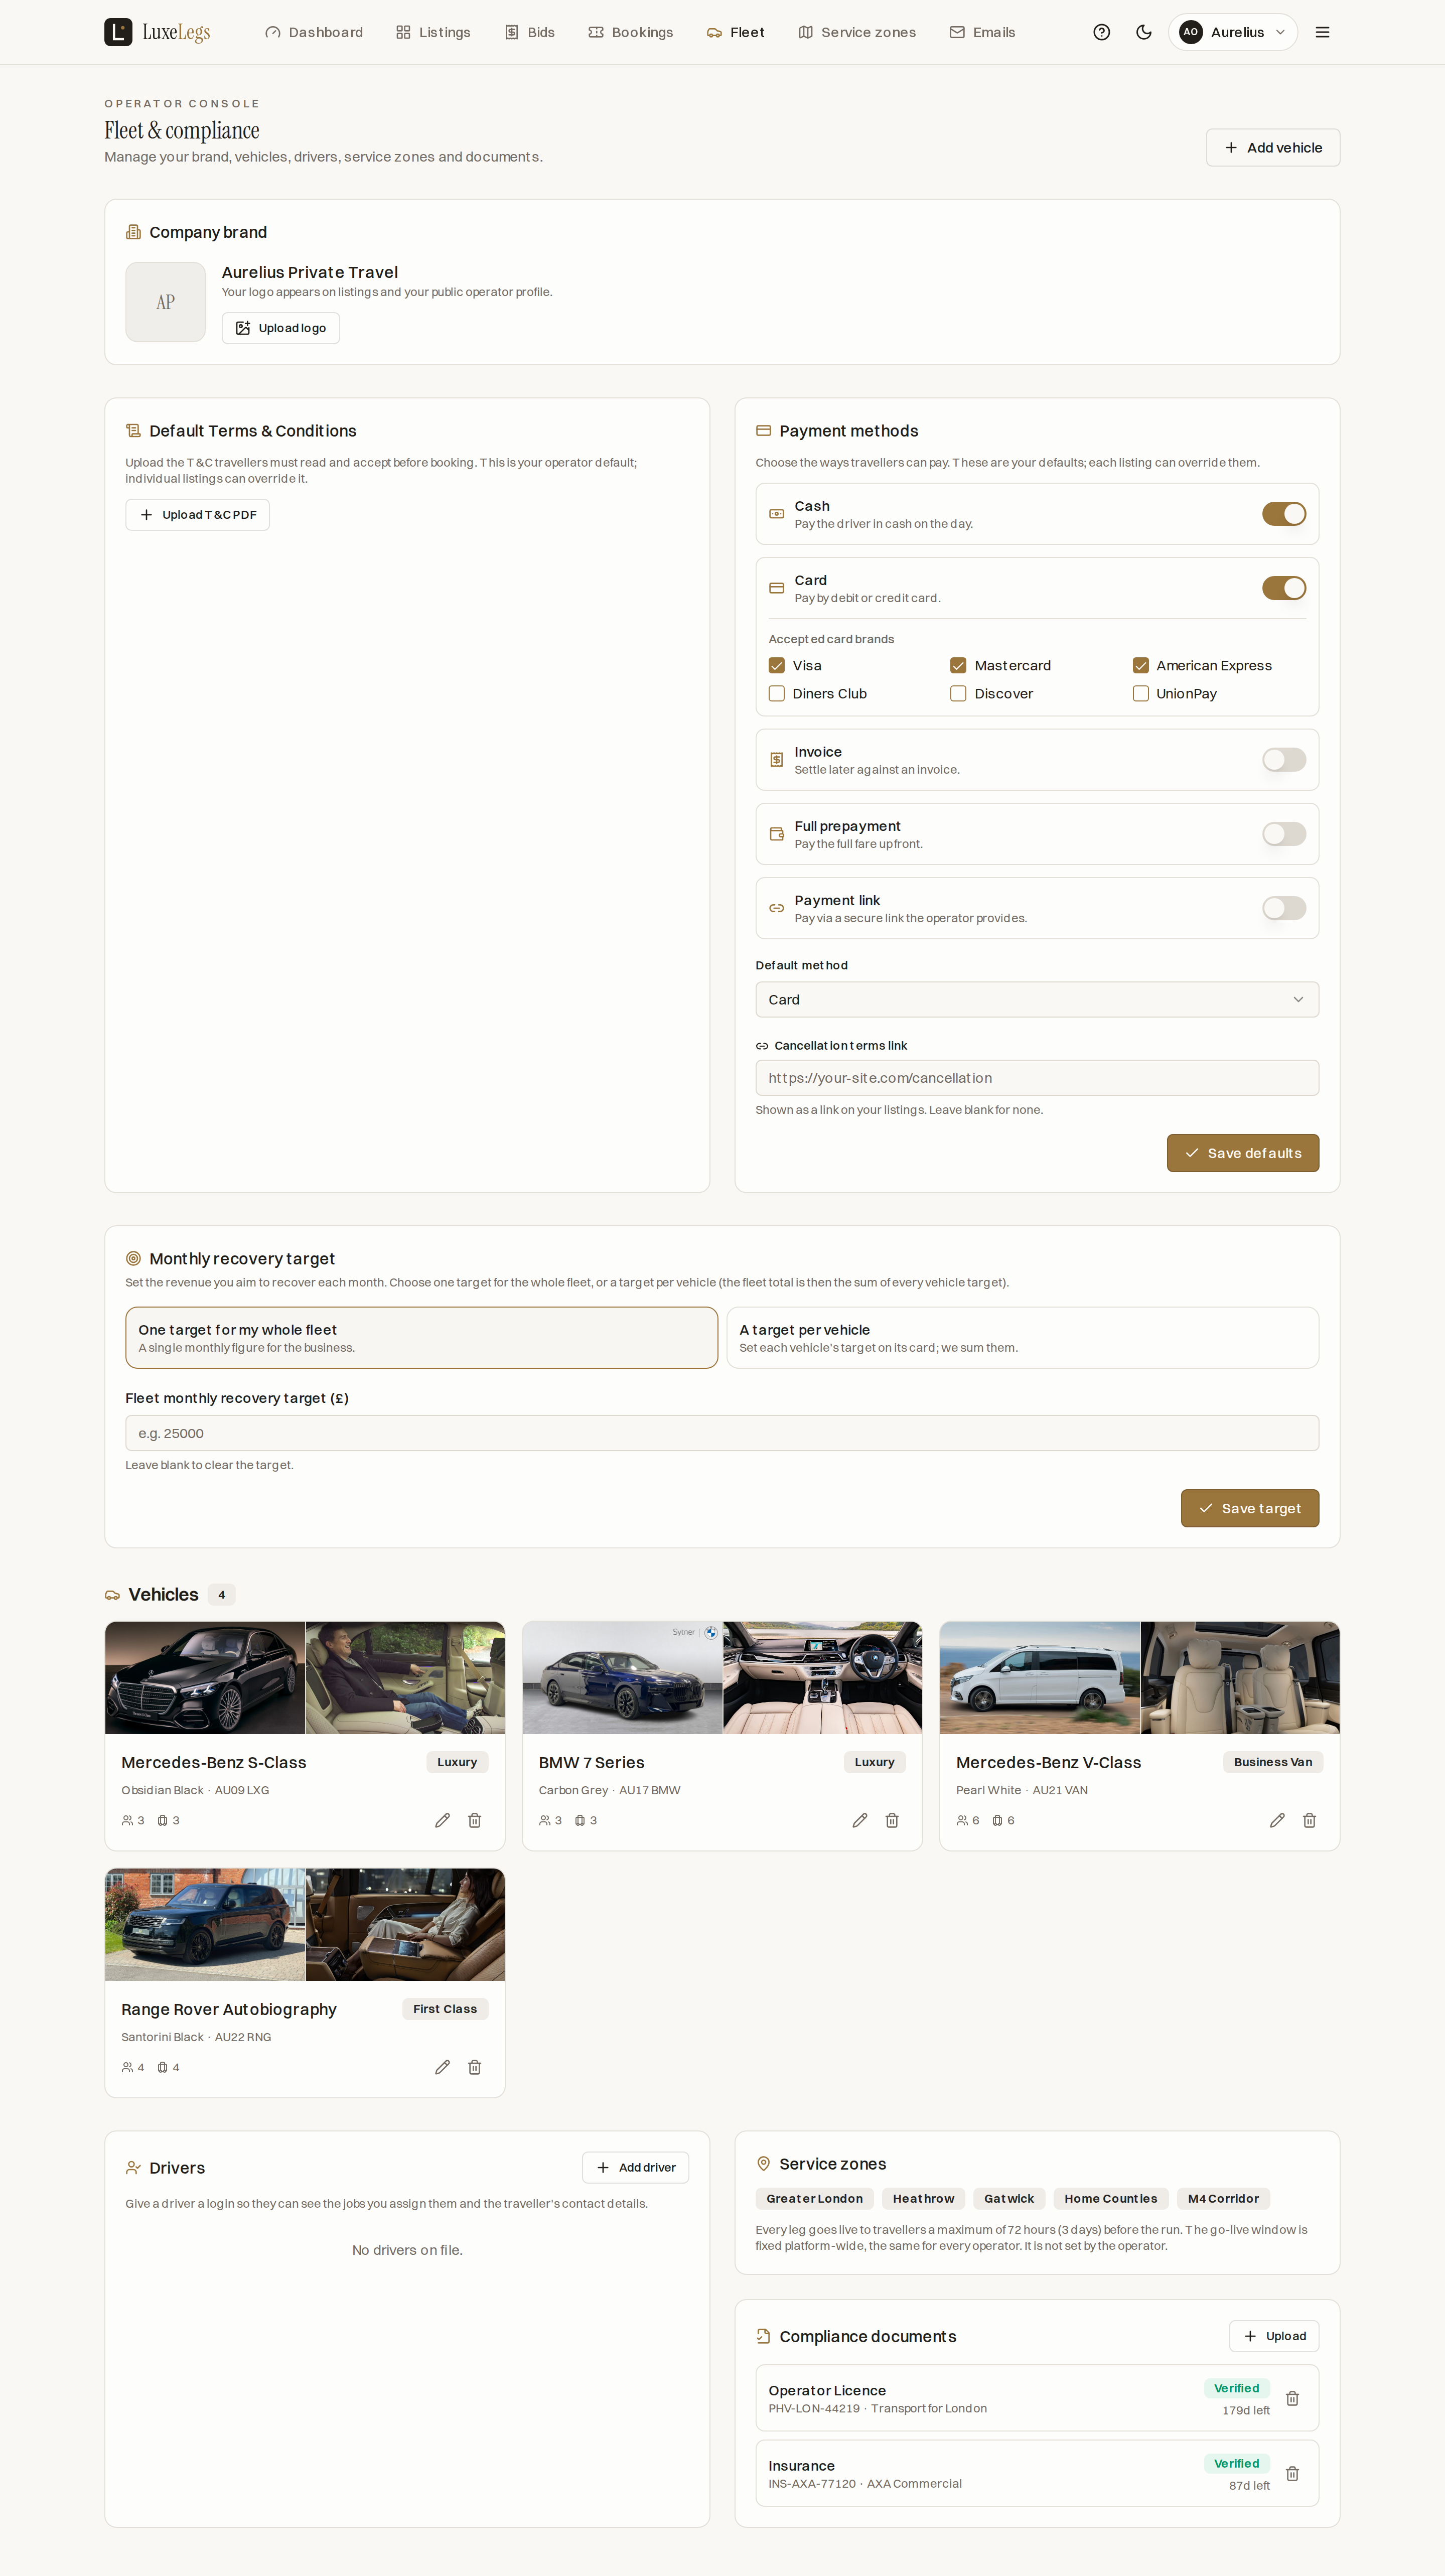
| Fleet | Manage vehicles, driver records and compliance documents, and create login accounts for drivers. |
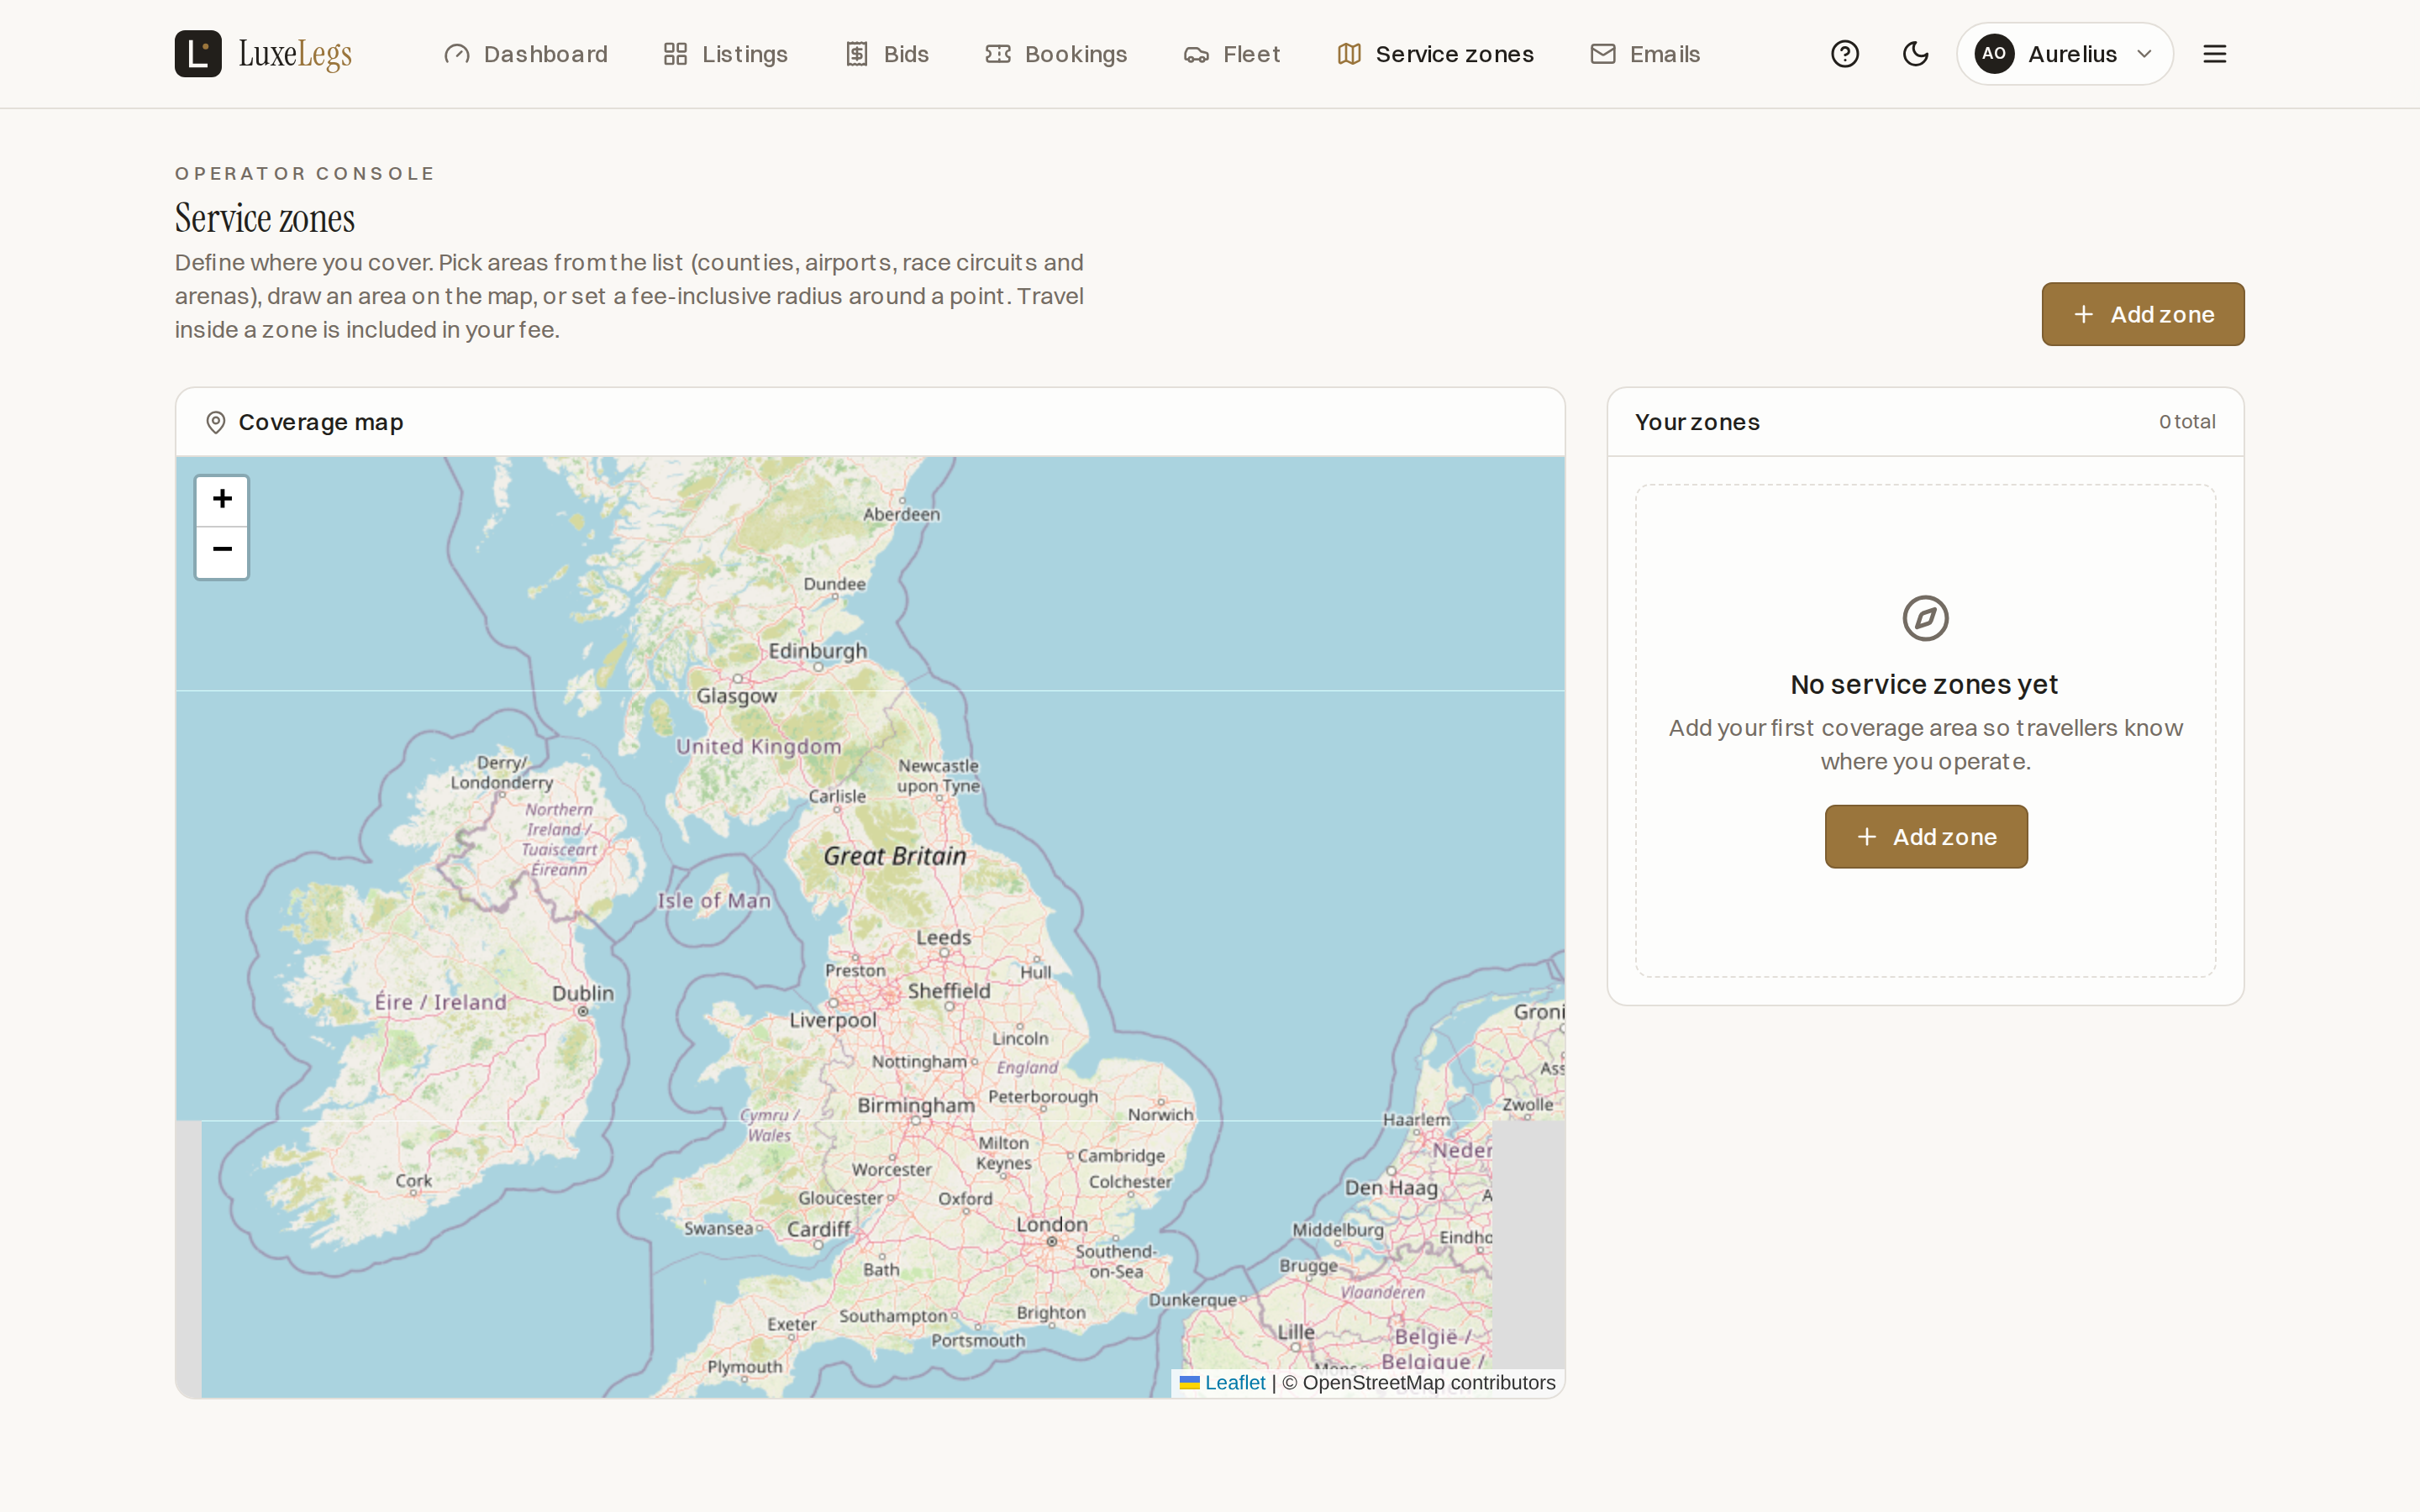
| Service zones New | Set the areas you cover: pick from a searchable list of UK areas, draw an area on the map, or set a fee inclusive radius around a point. |
| Emails | Edit the templates travellers receive, such as bid accepted and bid declined. |
| Billing & plans | Choose a plan and commission rate, and track recovered revenue. |
Atlas is 0 pounds a month at 18 percent commission. Meridian is 50 pounds a month at 15 percent. Sovereign is 199 pounds a month at 12 percent. The plan sets both the monthly fee and the commission taken on each recovered journey.
Listings now follow a lead time before they go live. The platform default is 5 days before the pickup. List a journey further ahead than that and it sits as scheduled: it stays on your Listings screen so you can see and edit it, but travellers cannot see or book it yet. When the journey moves inside the 5 day window, the listing turns live on its own. You do nothing.
Dead legs firm up closer to the day. Holding a listing as scheduled until 5 days before pickup keeps early, uncertain journeys off the marketplace, then releases them automatically once the trip is close enough to sell with confidence.
From the dashboard, list a spare journey with its route, time and price, and decide whether to accept bids.
On the Bids screen, see each offer with a highest and meets reserve tag, then accept the one you want.
Open the confirmed booking and assign a driver from your fleet. They receive the job in their console.
The driver completes the pickup. Mark the booking complete when the trip is done.
Recovered revenue updates on the dashboard and counts towards your monthly target.
Operators · Billing
LuxeLegs now runs on operator direct billing by default. The operator collects the fare from the traveller off platform, in whatever way they already take payment. LuxeLegs then bills the operator once a month for two things: the plan's monthly fee and the commission on every journey sold that month. No card is charged inside the app under this model.
The payment model is a single, site wide setting. An administrator changes it from the admin Settings screen, and it applies to every operator at once. There is no per operator toggle.
Operators · Service zones
Service zones tell travellers where an operator covers. Travel inside a zone is included in the fee. There are now three ways to define coverage, and they can be mixed freely.
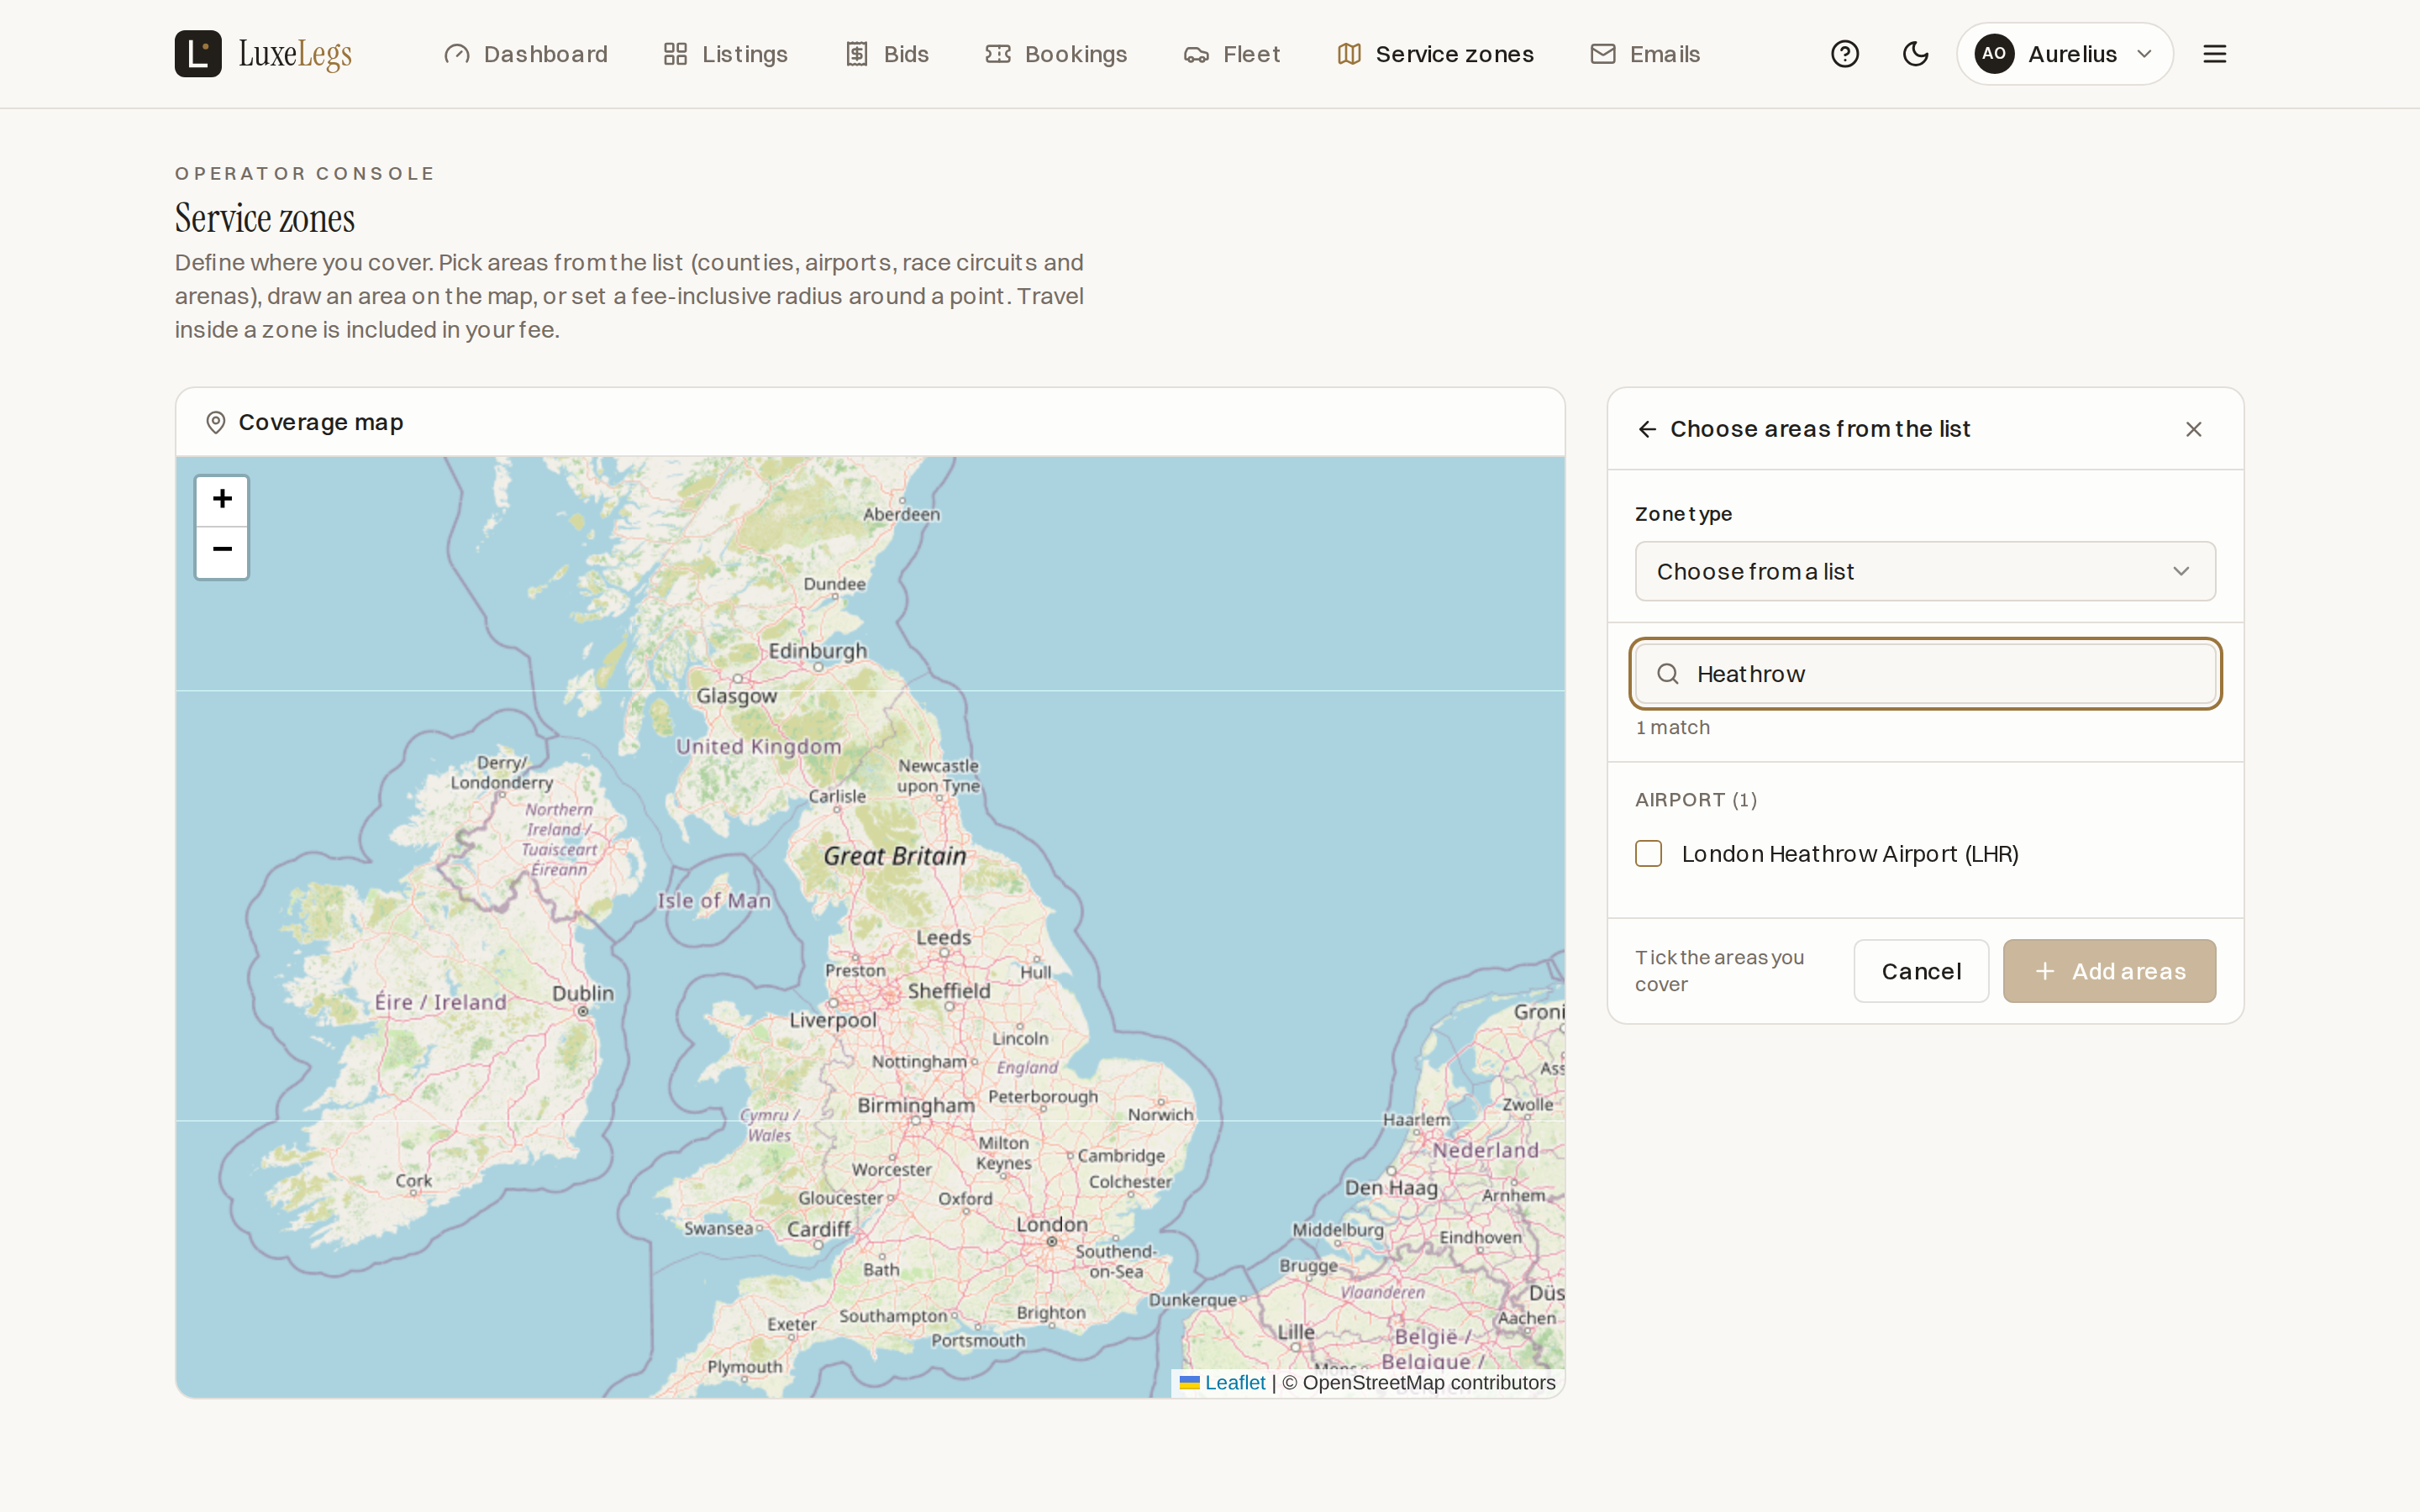
Start typing and the list narrows live to match the letters and words you enter, so a long list of counties or airports becomes a short, relevant one. Type more than one word to match across a name and its area, for example a circuit and its county.
From the operator console, go to Service zones and choose Add zone.
Set the zone type to Choose from a list to open the searchable picker.
Type to narrow the list, then tick every area you cover across counties, airports, circuits and arenas.
Press Add to save all your ticked areas at once. Each becomes a zone in your list.
Mix in a drawn area or a fee inclusive radius for anything the list does not cover.
Operators · Email templates
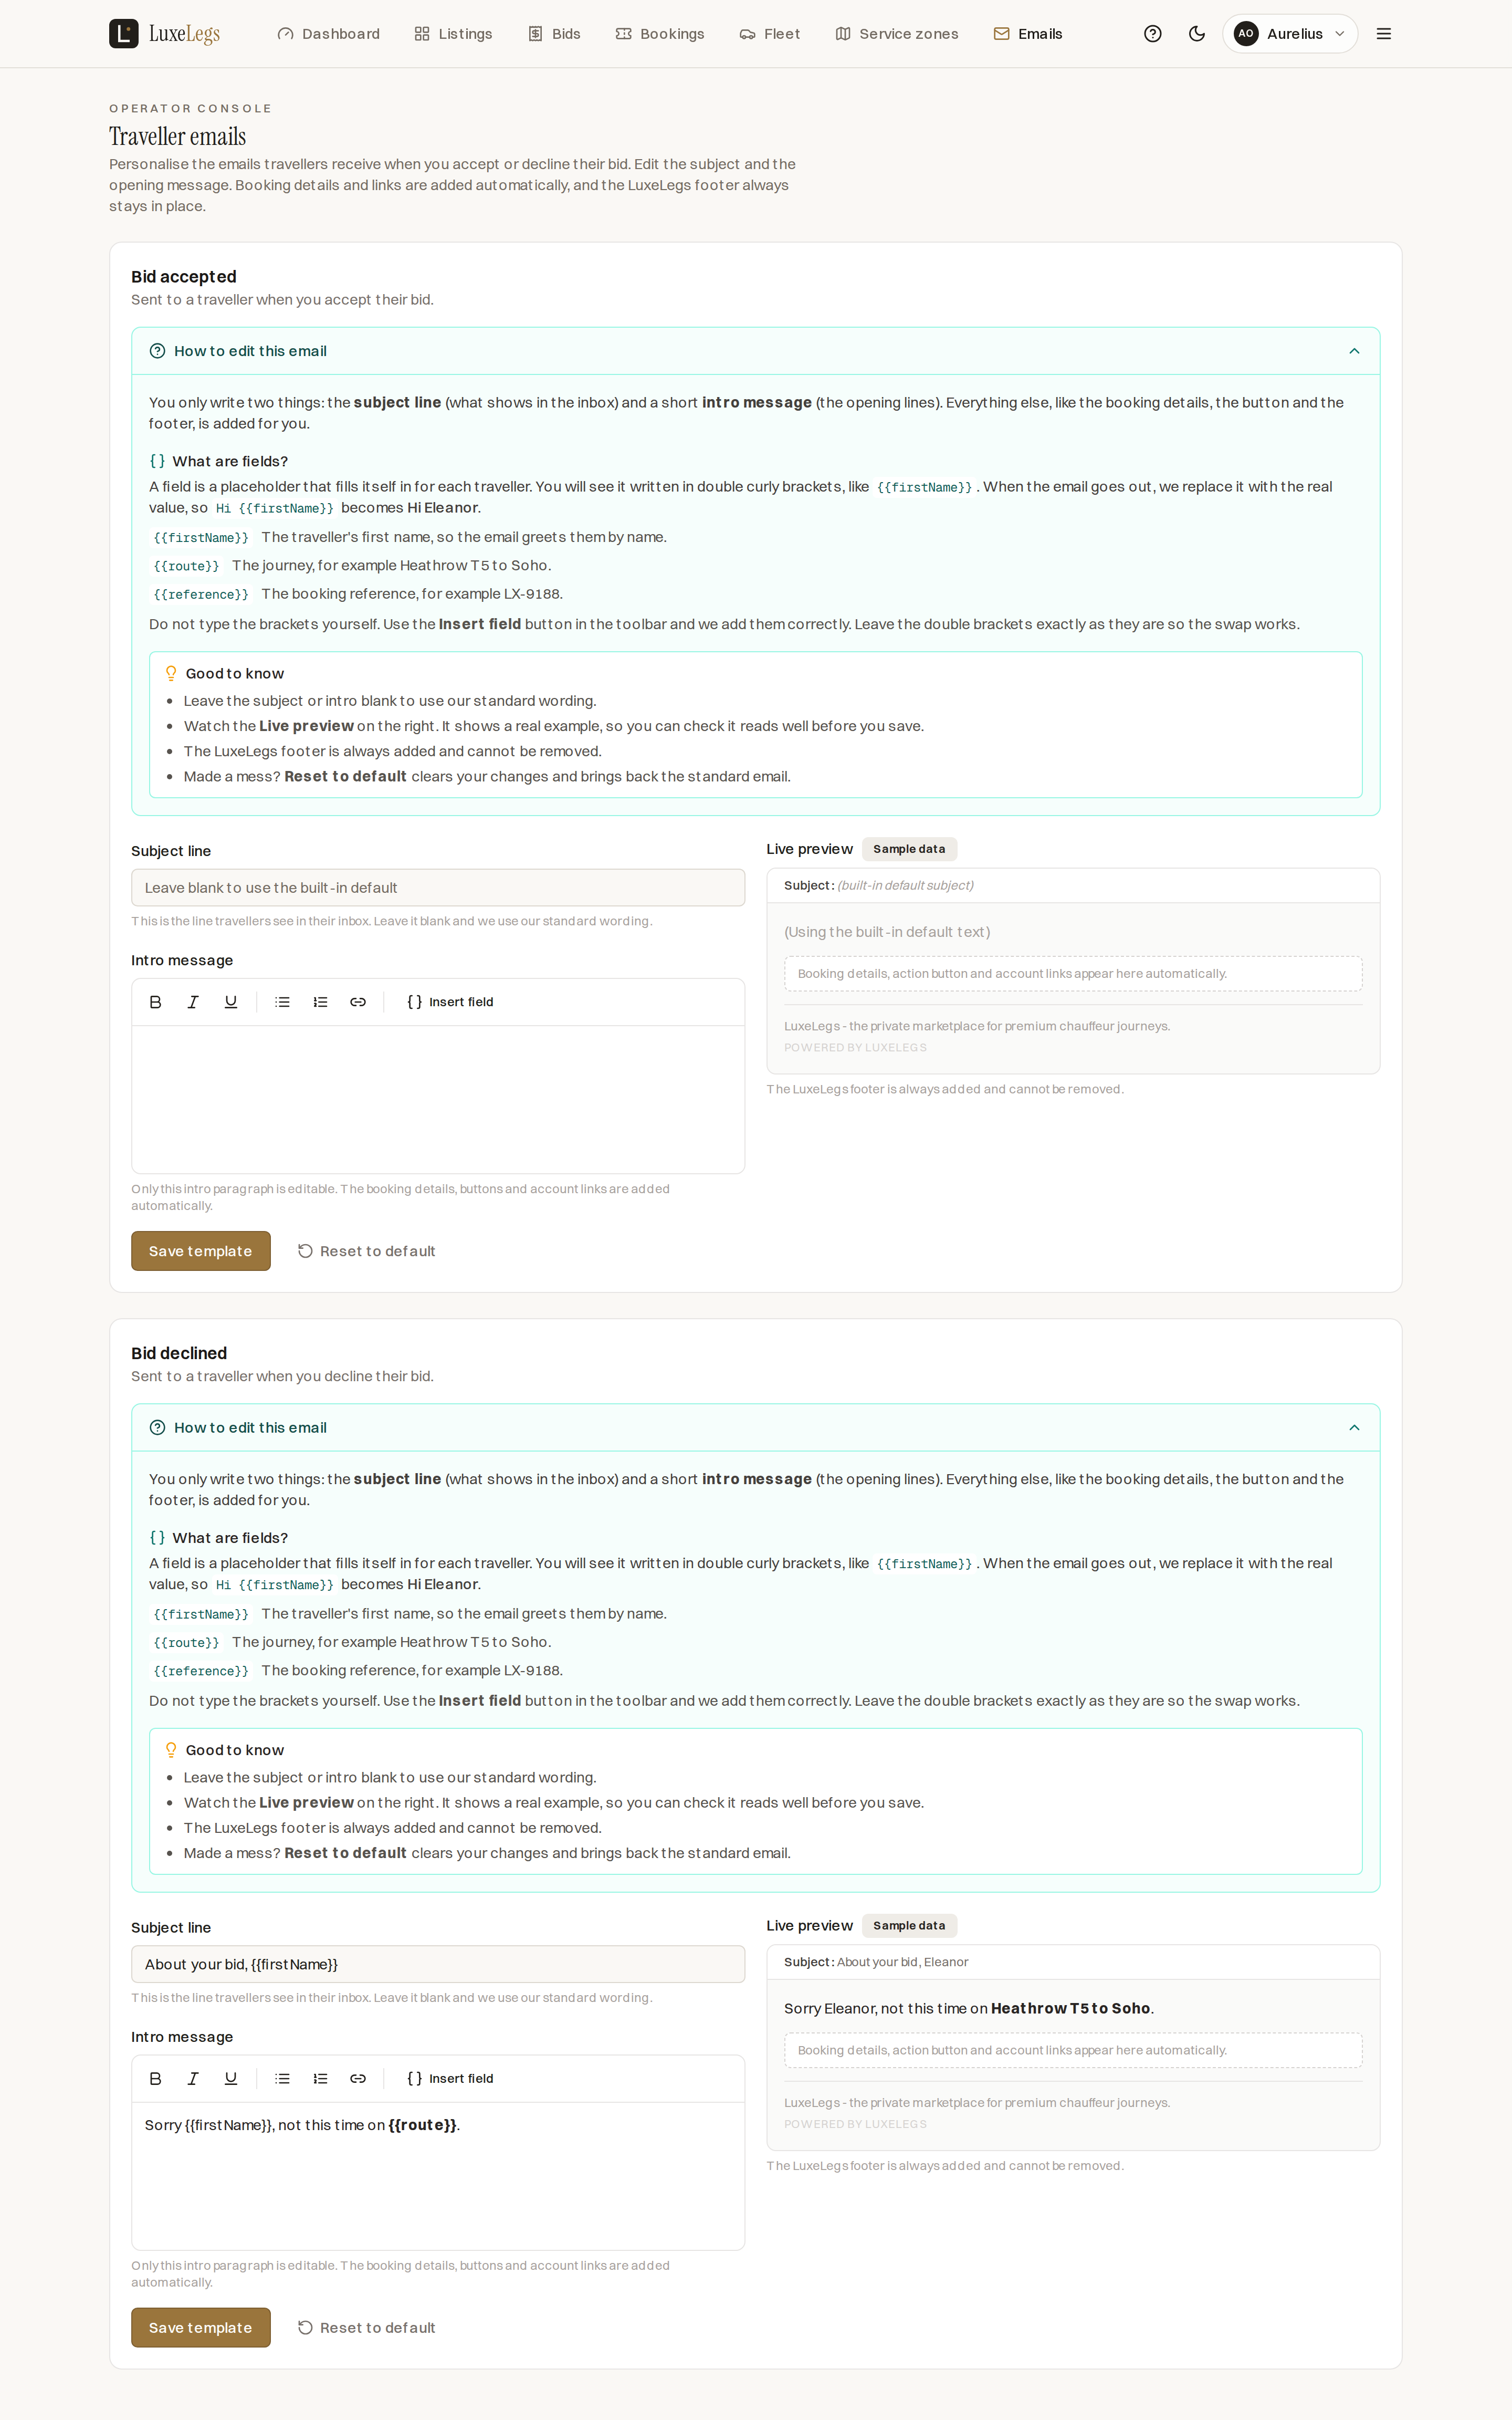
Operators can personalise the emails travellers receive when a bid is accepted or declined. You write two things: the subject line that shows in the inbox, and a short intro message at the top. The booking details, the action button, the account links and the LuxeLegs footer are added for you and cannot be removed, so every email stays complete and on brand.
| Template | When it is sent |
|---|---|
| Bid accepted | Sent to a traveller when you accept their bid. |
| Bid declined | Sent to a traveller when you decline their bid. |
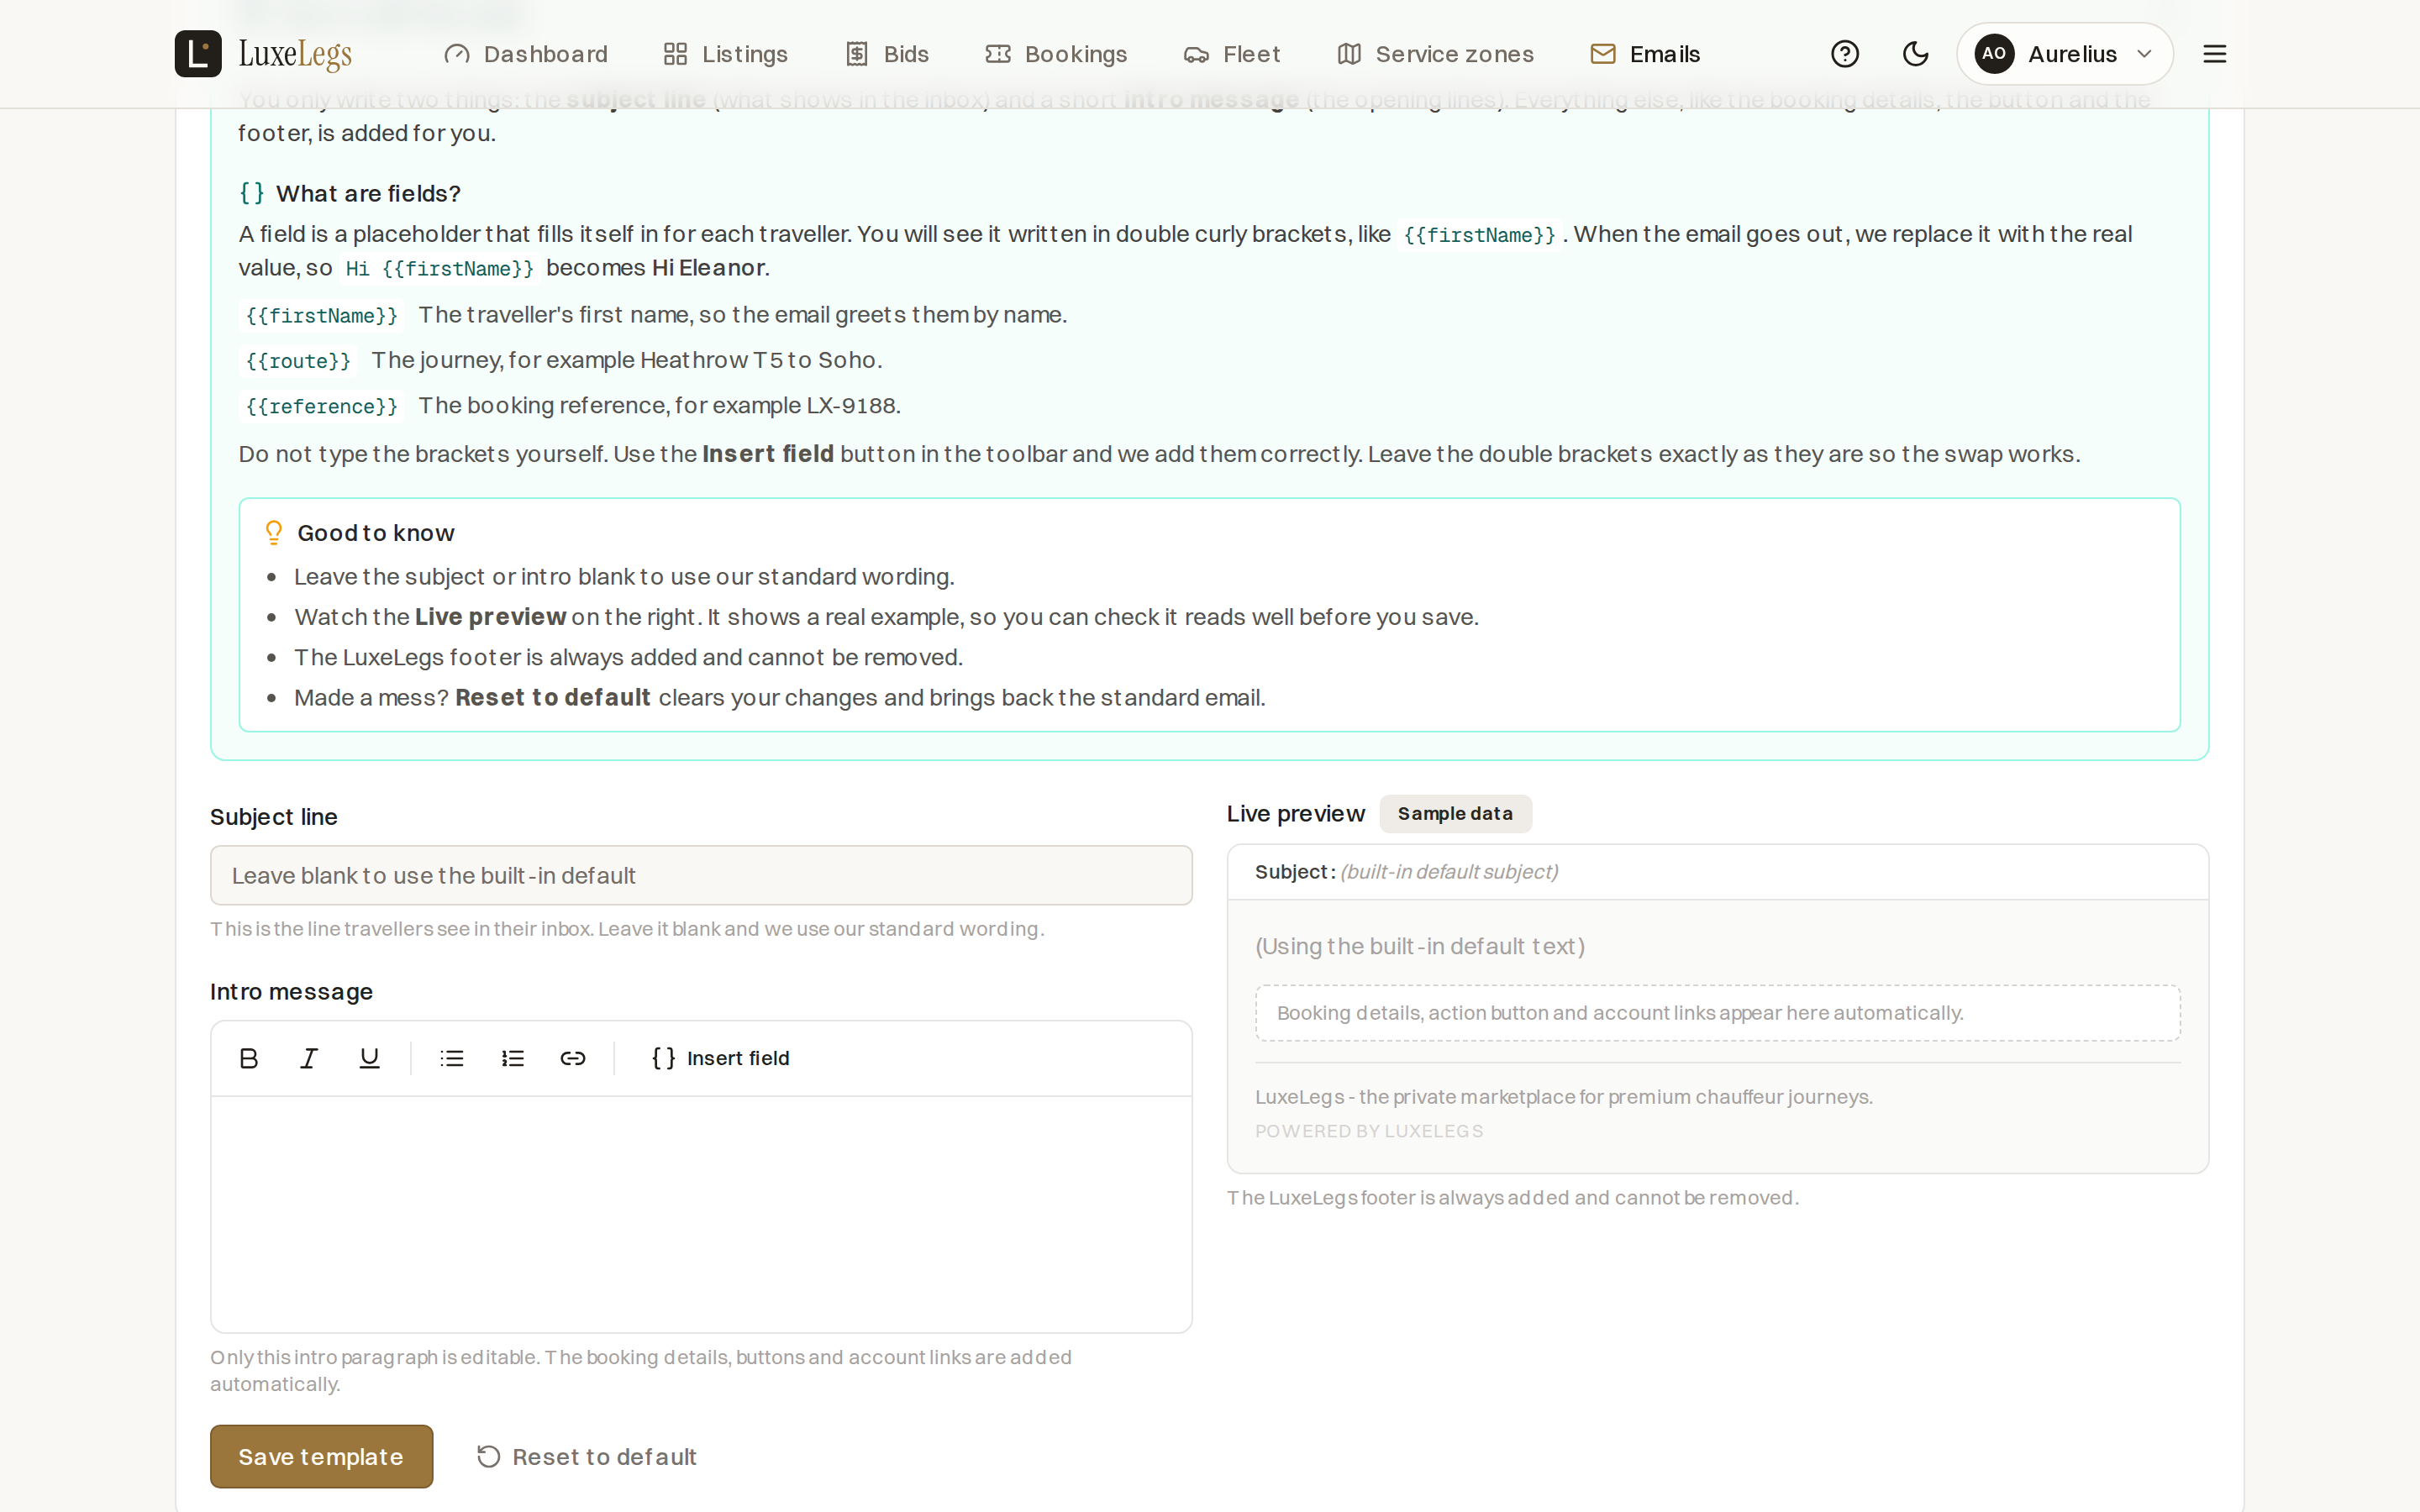
A field is a placeholder that swaps in the real value for each traveller. You will see it in double brackets, so Hi {{firstName}} becomes Hi Eleanor when the email goes out. Use {{firstName}} for the traveller's first name, {{route}} for the journey and {{reference}} for the booking reference. Do not type the brackets yourself. Use the Insert field button in the toolbar so they are added correctly.
From the operator console, go to Emails and find the Bid accepted template.
Type the line travellers see in their inbox. Leave it blank to use the standard wording.
Add an opening message and drop in fields such as the first name with Insert field.
The preview on the right shows a real example with sample data, so you can read it before you save.
Press Save template to use your version. Reset to default clears your changes and brings back the standard email.
User type 03 New
Referrers grow the marketplace by bringing in new travellers and operators. When someone they invited goes on to sell or book a journey, the referrer earns a share of the commission LuxeLegs makes on that journey. There is no public referrer sign up: a LuxeLegs administrator either creates a dedicated referrer account, or switches on referrer earning for an existing traveller, operator or driver. That person then sees a Refer & earn area alongside their normal use of LuxeLegs, on the same login and email they already have.
| Feature | What it does |
|---|---|
| Dashboard | See referees, the commission earned so far, and the current unsettled balance in one place. |
| Invite a traveller or operator | Start a sign up by entering a first name, surname and email, and choosing traveller or operator. LuxeLegs emails the prospect a personal link. |
| Track referees | Watch each invite move from pending to joined once the person completes sign up through your link. |
| See your share | Every sold journey by a referee credits you 10 percent of the commission LuxeLegs earned on that journey. Your running total and balance update as journeys sell. |
| Request a payout | Ask to be paid your unsettled balance. An administrator marks it paid and the balance resets. |
| Account & security | Manage password and two factor authentication on the account page. |
A traveller, operator or driver does not need a separate referrer account. An administrator can switch referrer earning on for their existing account, and the Refer & earn area then sits alongside their usual dashboard. A traveller with referrer earning switched on, for example, still books journeys as normal and separately invites prospects, tracks referees and requests payouts from the same login.
You earn 10 percent of the commission LuxeLegs takes on a journey, never a cut of the operator's monthly plan fee. You are credited once per sold journey. If you referred both the operator and the traveller on the same journey, you are still paid once for it, not twice.
Log in with the account a LuxeLegs administrator created for you. The console opens on your referrer dashboard.
Enter the prospect's first name, surname and email, choose traveller or operator, and send. They receive a personal sign up link.
When they complete sign up through your link, their account is tied to you and the invite turns from pending to joined.
Each journey your referee sells or books credits you 10 percent of the commission LuxeLegs earned. Your balance grows automatically.
When you are ready, request payment of your unsettled balance. An administrator marks it paid and your balance resets to zero.
User type 04
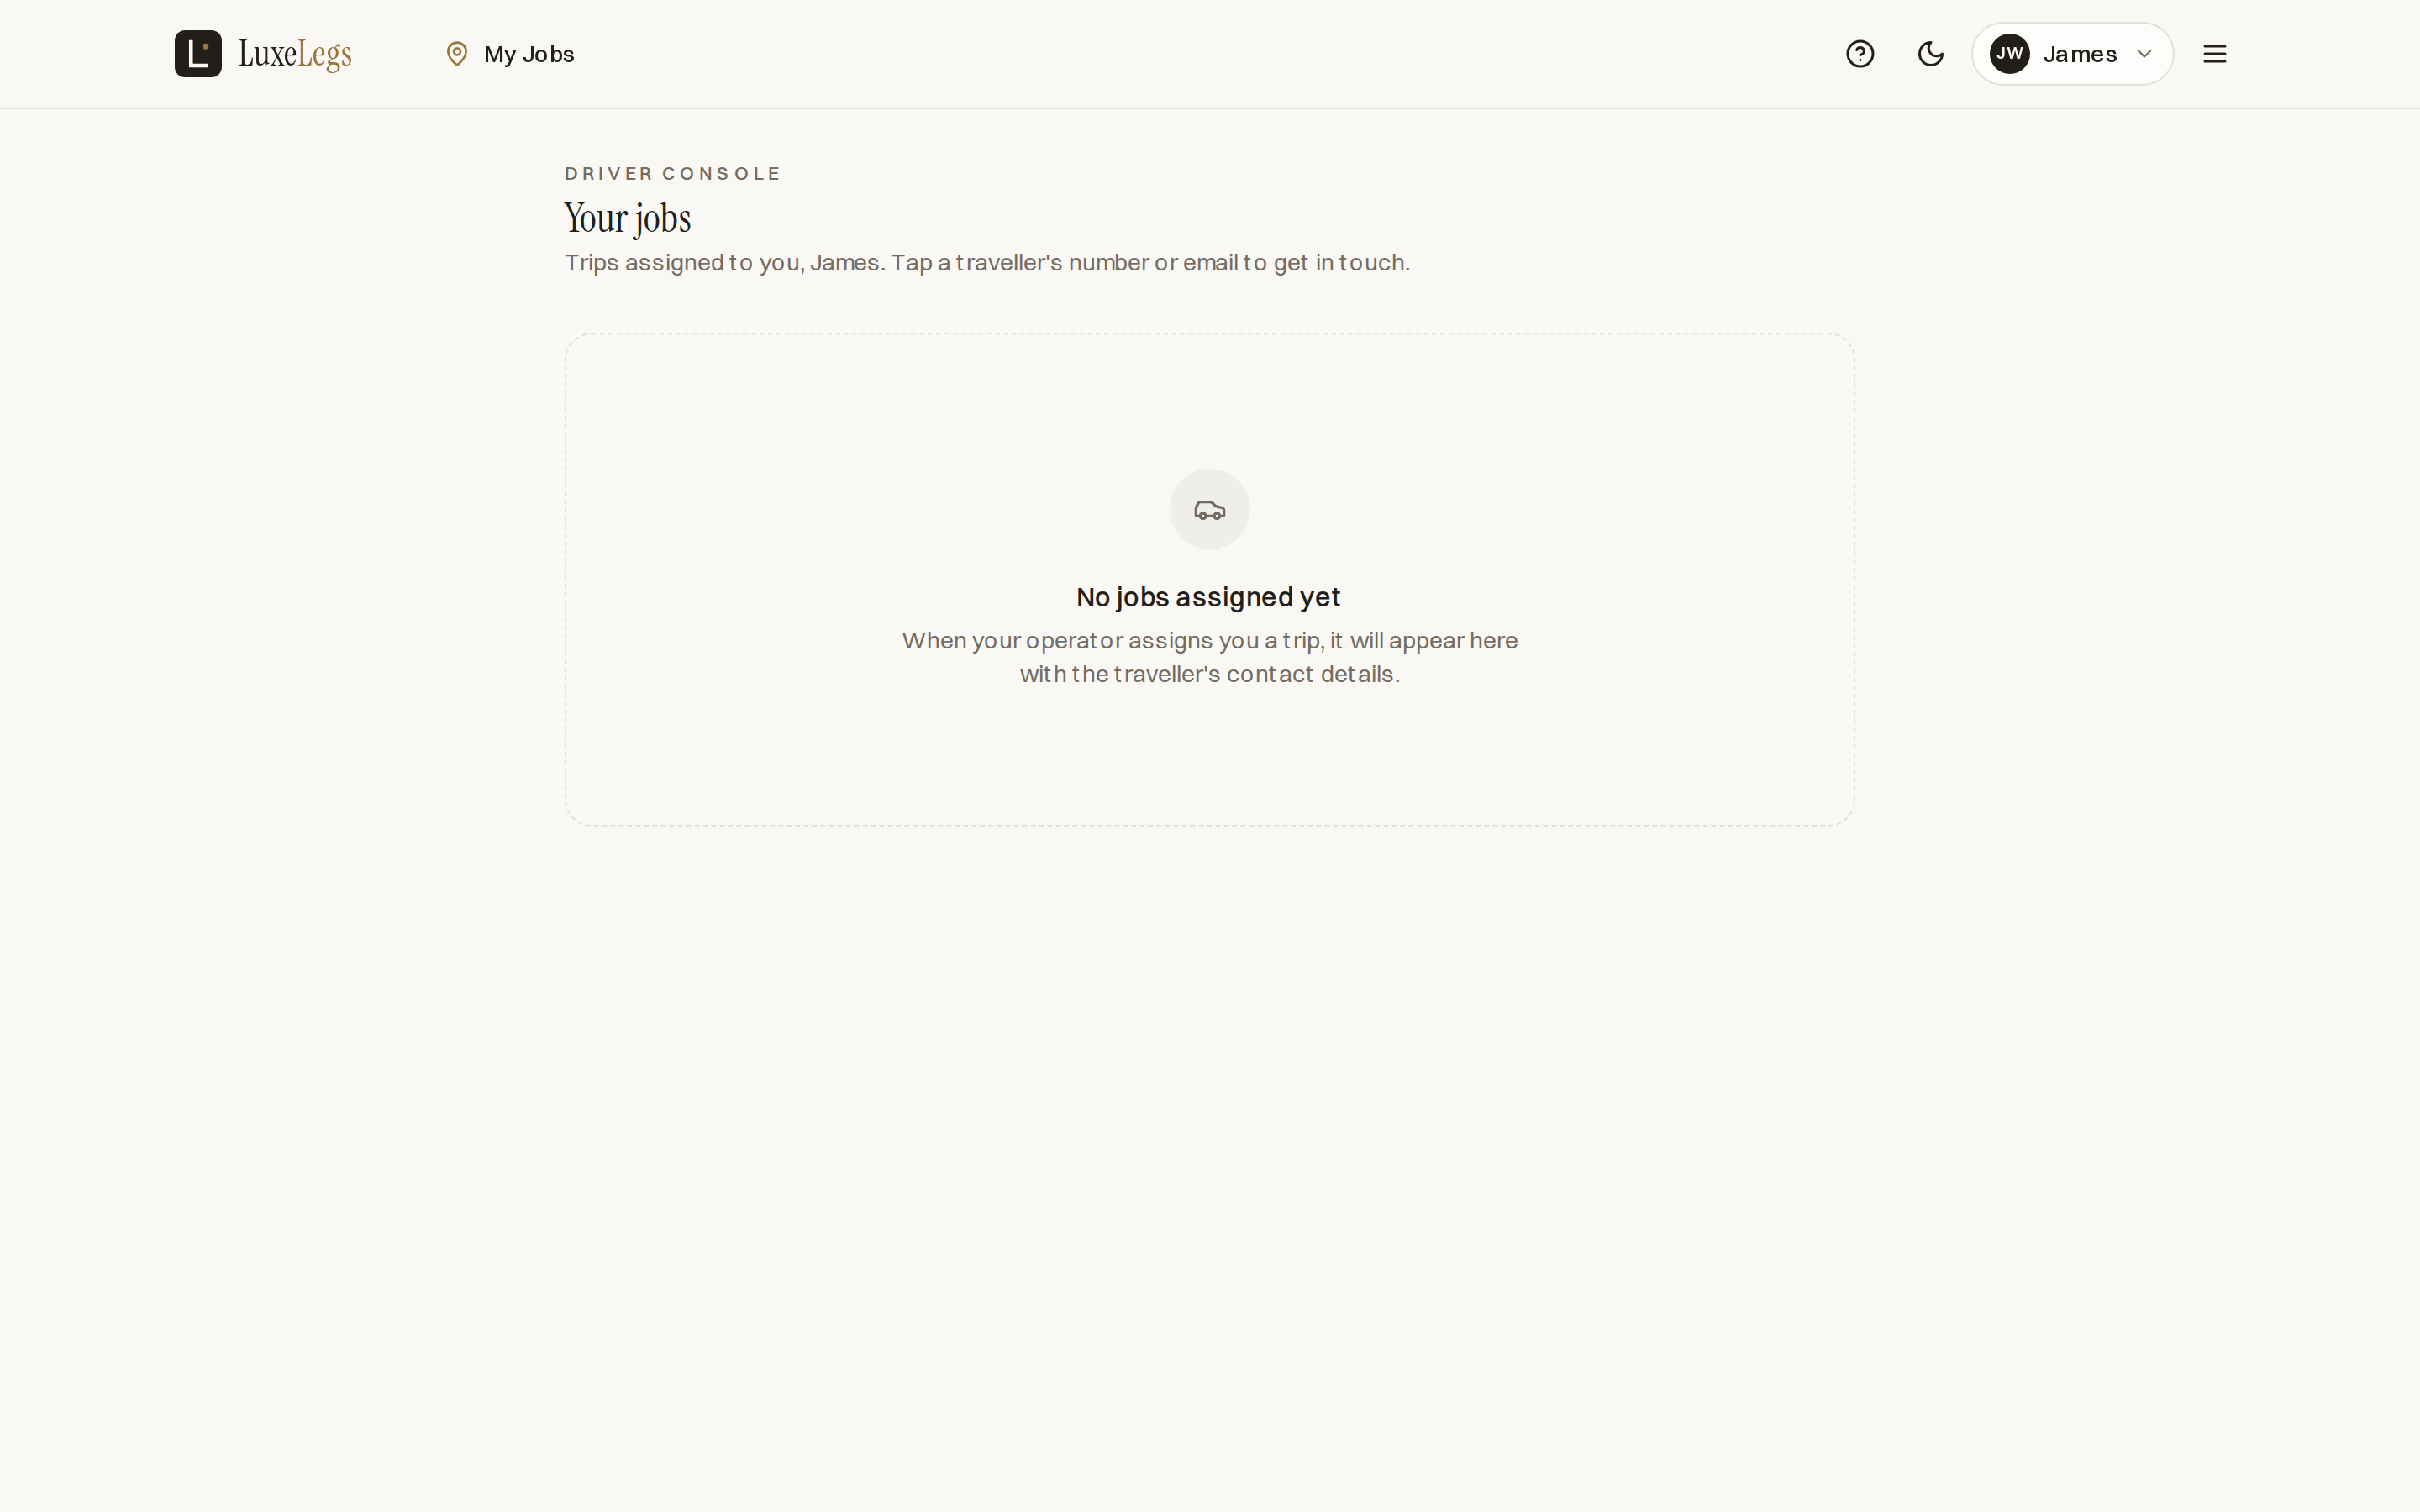
Drivers get a focused console with one job: see the trips assigned to them. Their operator creates the login, then assigns bookings that appear here with everything needed for the pickup.
| Feature | What it does |
|---|---|
| My Jobs | See every trip the operator has assigned, newest first. |
| Job detail | View the route, date and time, and the assigned vehicle for each job. |
| Status at a glance | Each job carries a status: confirmed, in progress, completed or cancelled. |
| Traveller contact | Tap the traveller's number or email to get in touch on the day. |
| Account & security | Manage password and two factor authentication on the account page. |
Log in with the account the operator created. The console opens straight to My Jobs.
Review the day's trips with their routes, times and vehicles.
Use the traveller's number or email to confirm the pickup point and timing.
Drive the journey. The operator marks the booking complete once it is done.
Across every account
Signing up, approval and two factor authentication work the same way for travellers and operators. These steps keep the marketplace trusted on both sides.
When you create an account you choose your role, then decide on two factor authentication. The two factor option is a toggle that is switched on by default, because it adds a second check at sign in. You can change it later on your account page.
An email address is the unique identifier across LuxeLegs, so the same address cannot be registered twice, whether through self service sign up, an administrator created account, a referral invite, or an email change. Matching ignores case, so Name@Example.com and name@example.com count as the same address. If an address is already in use, the person sees a clear "That email is already registered" message.
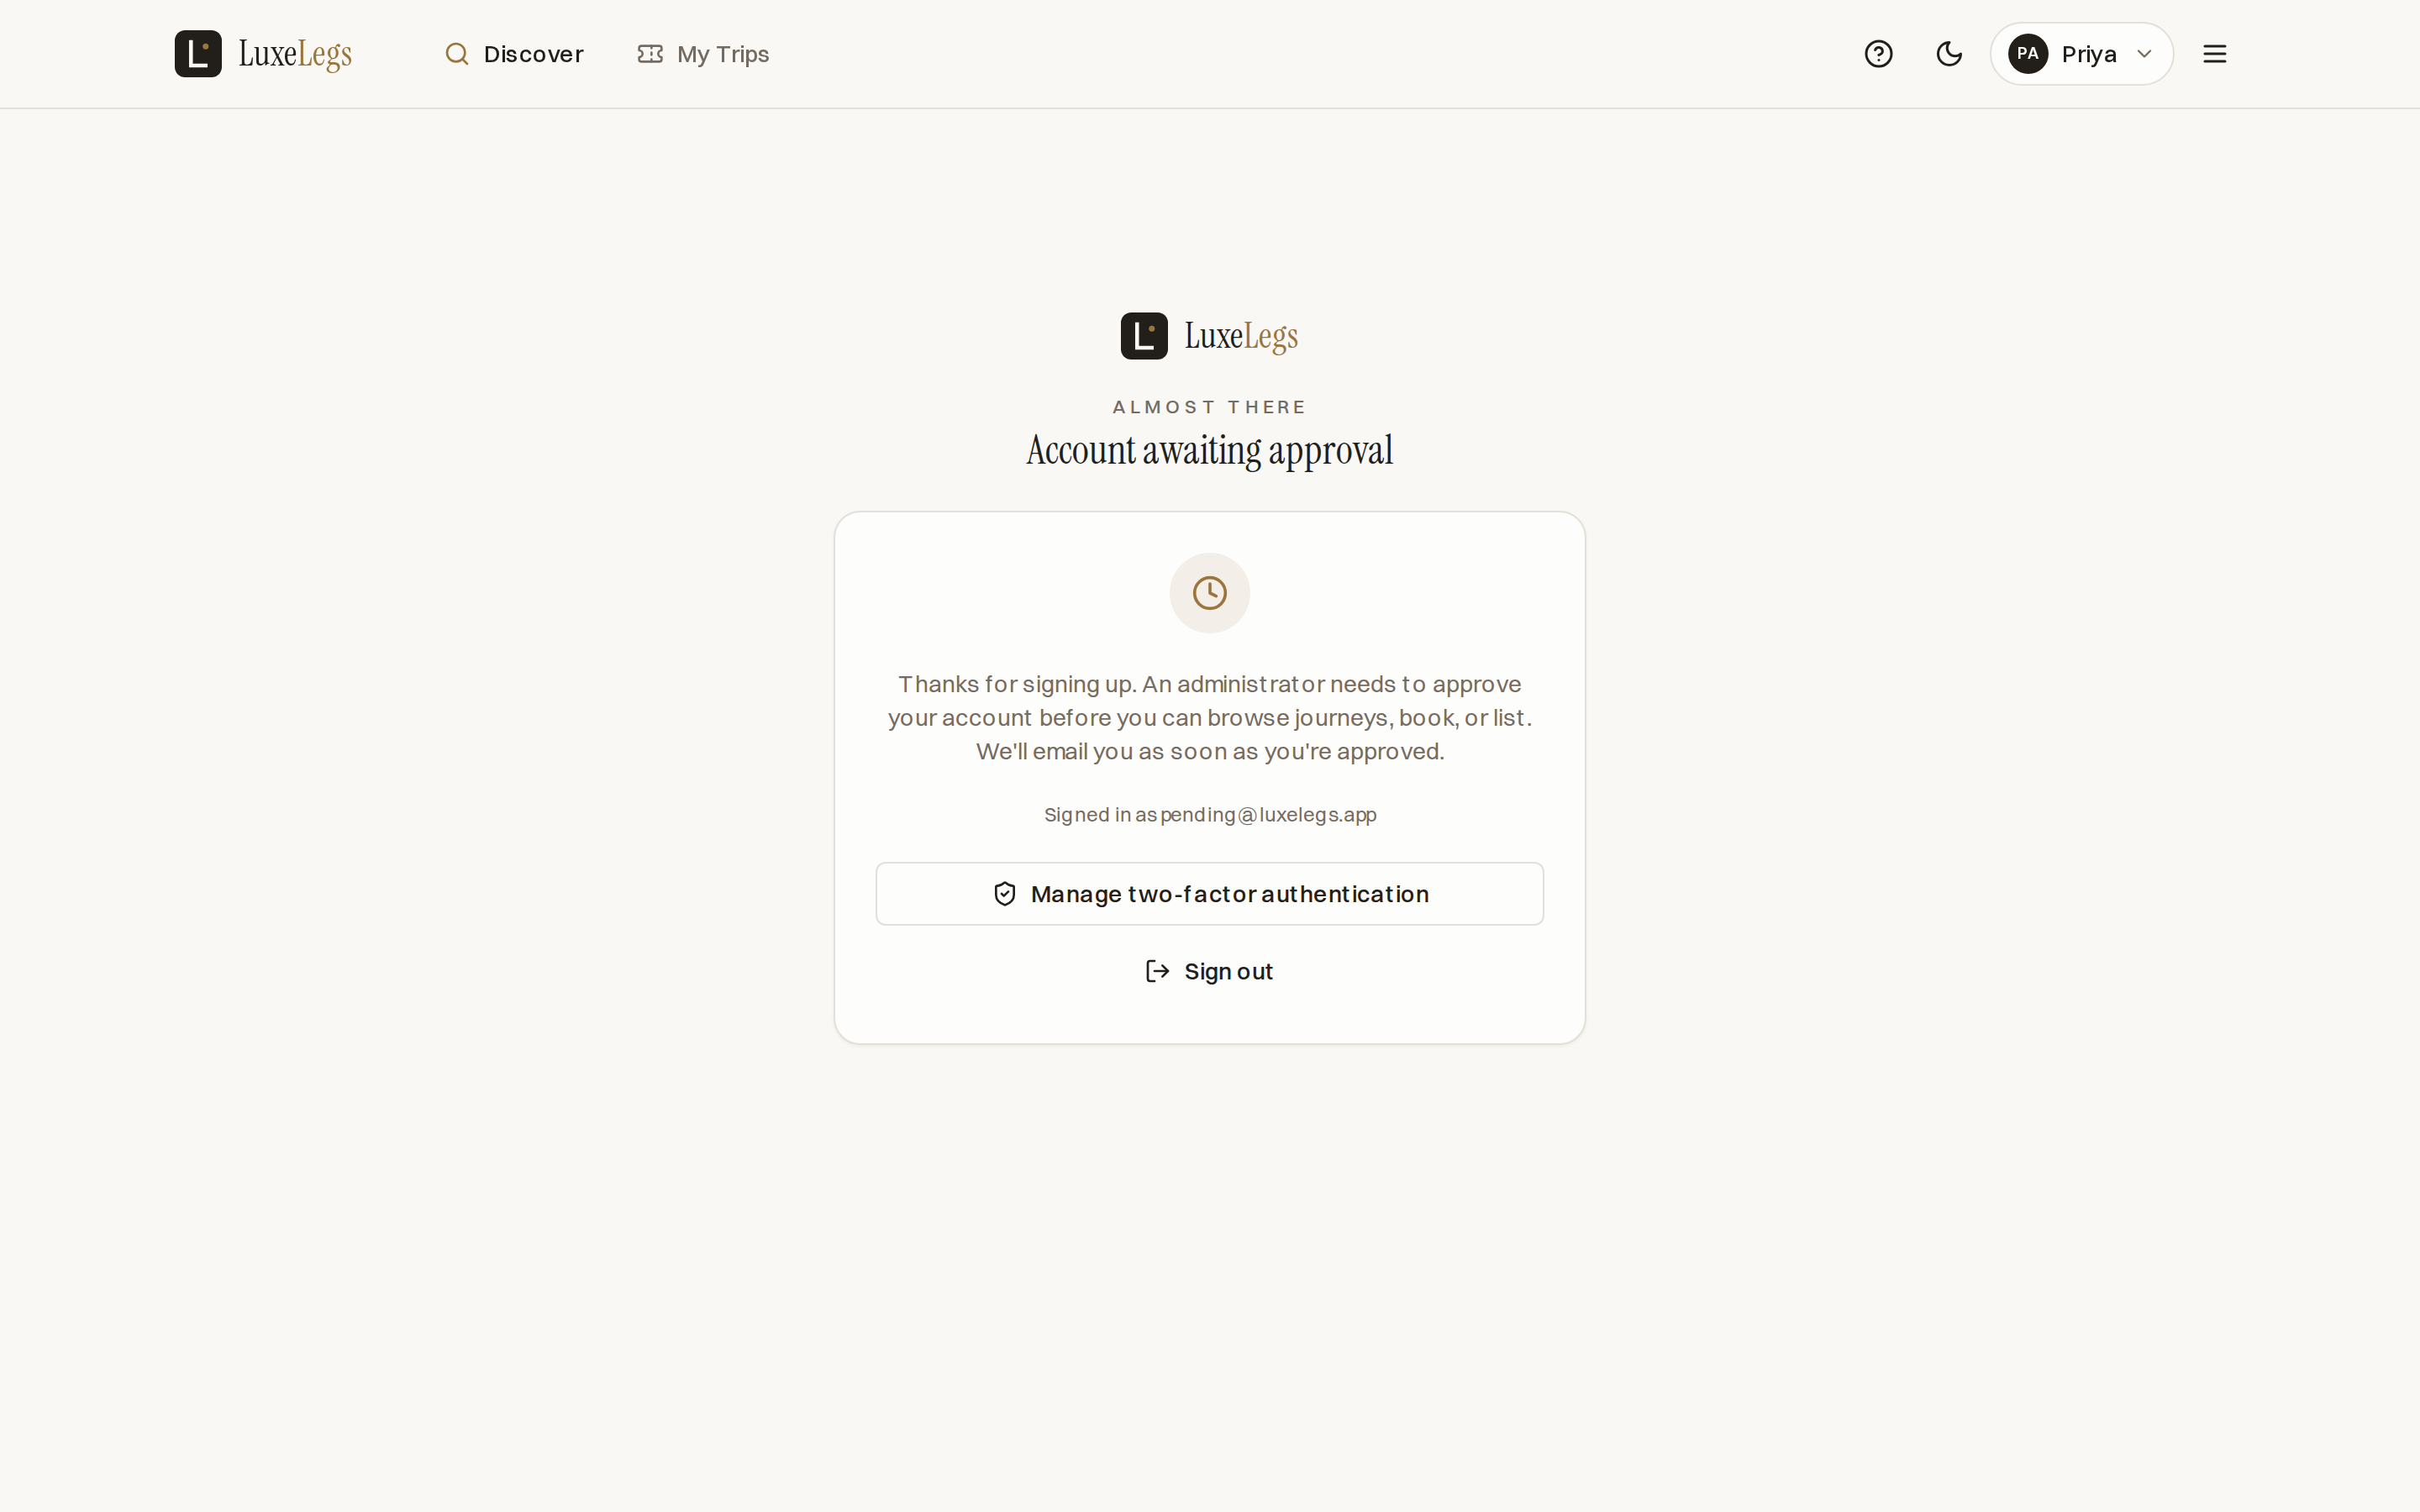
New self service sign ups are held for approval. Until an administrator approves the account, the person sees a friendly locked screen and cannot browse journeys, book or list. They can still manage their two factor authentication while they wait.
Administrators can also create an account of any type directly (traveller, operator, driver, referrer or admin). Accounts created this way are active immediately, with a one time password to hand over. When creating a driver, an operator is selected so the driver is linked to the right fleet.
Administrators could already suspend an account. A super administrator can now permanently delete a user as well. Deleting removes the person's login and frees their email address for reuse, while their past bookings, bids, reviews and commission history are kept for accounting, with their name replaced by "Deleted user" so records stay intact and anonymous.
A Location insights view helps the LuxeLegs team support operators with marketing. For each UK county, it shows how many travellers are based there, how many have it as a preference, and a combined total that counts a traveller once even if they both live in and prefer the same county. It also lists the specific places travellers typed in, such as airports and venues, with a count each, merging different capitalisations of the same place. A search box filters the view to one location, so the team can quickly see how many travellers are based near, or interested in, a given operator's area.
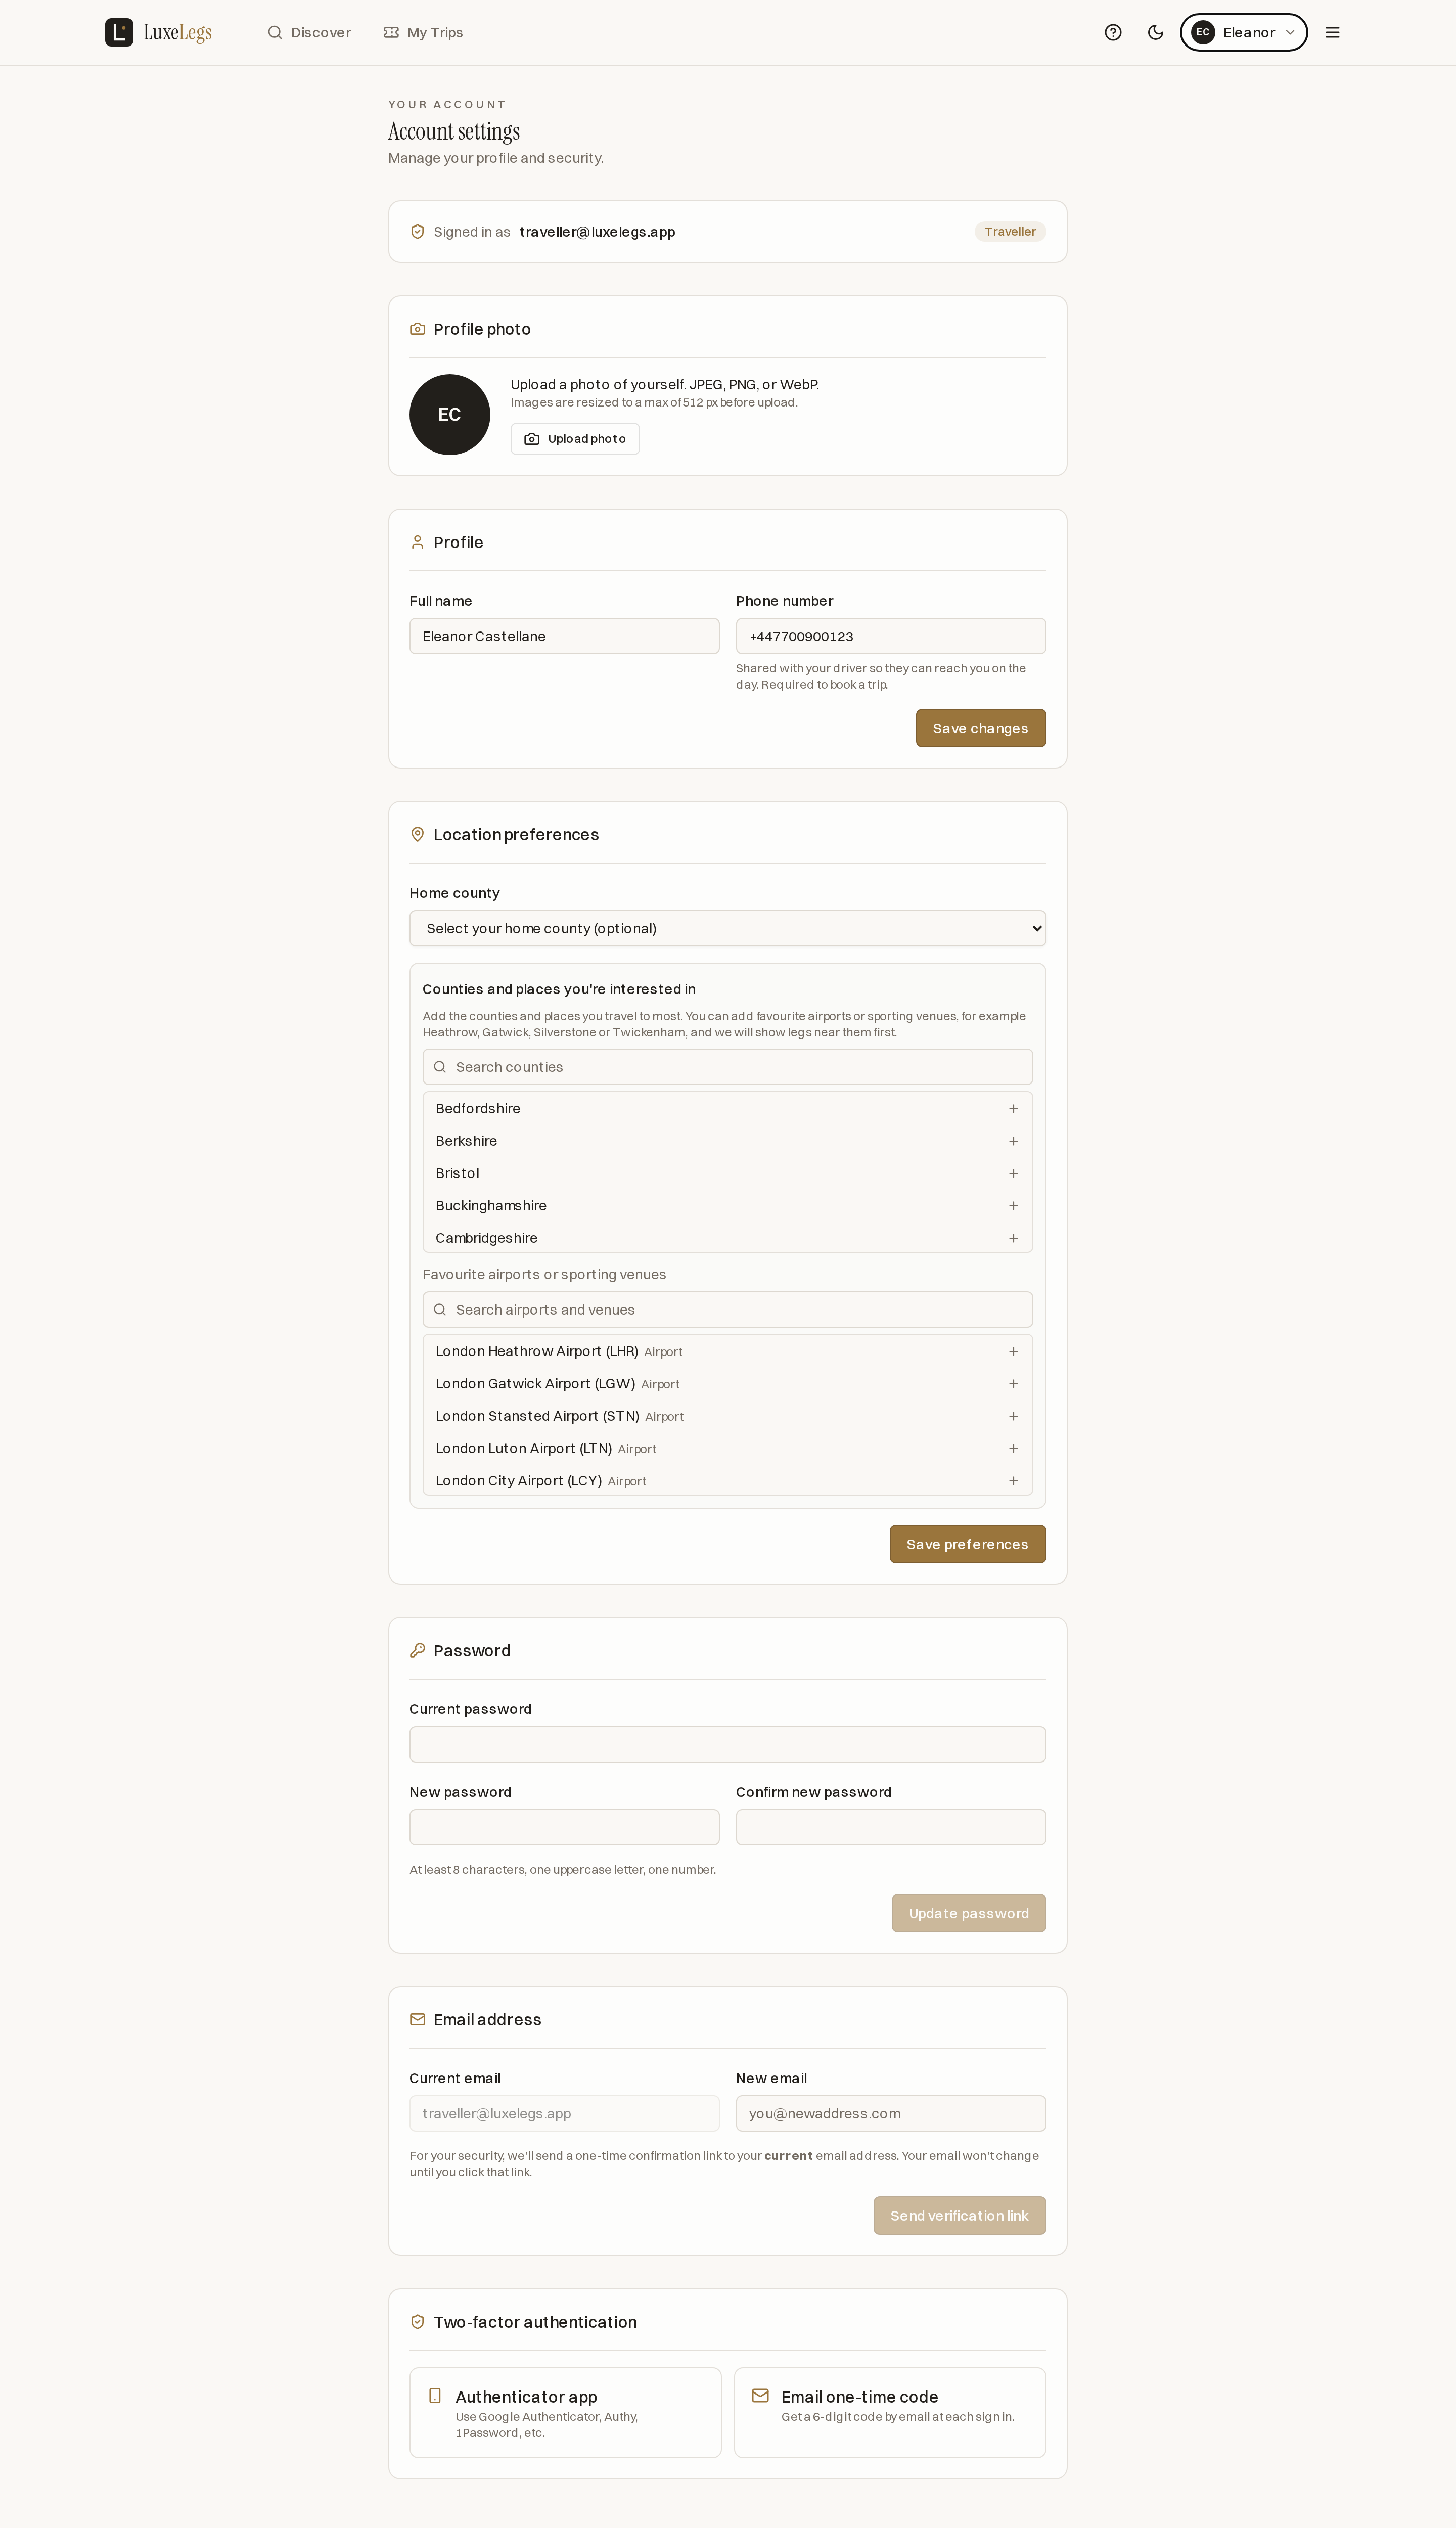
The account page is where any member updates their profile photo, name and phone, changes their password, changes their email through a secure confirmation link, and turns two factor authentication on or off.
Ready to explore
Try the demo to explore every screen with sample data, or open the app to get started with your own account.